本帖最后由 602293544 于 2019-11-26 14:36 编辑
发这个贴子主要是为了记录从安装使用过程中遇到的一些小问题以及备份一下自己配置过的东西,一些个人见解以及方便一些像我一样啥都不懂的小白,帖子中可能会有一下错误希望大佬及时批评指正避免误导一些小白。记录过程尽量发一下原帖地址方便扩展深造。 不定时更新下,以后在换设备先用着N1吧
ha版本0.97.1(已经升级0.102.2了,劫持的插件不知道还能不能用,我都刷机了)
1、安装 我用的是N1安装的ha 按照这个帖子教程安装的https://bbs.hassbian.com/thread-7747-1-1.html
2、ha文件夹的基本结构(缺啥文件夹新建就是了)
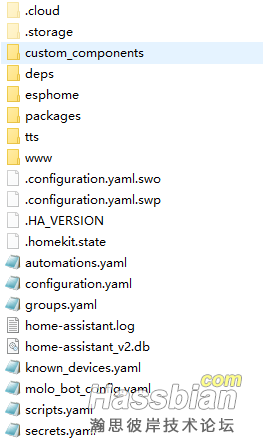
一些帖子GitHub会有这么一个文件夹 config 我刚开始看到的时候也是不懂,哇这是啥文件夹啊在哪啊怎么到处找不到啊 毕竟刚开始我用的是WinSCP
其实就是homeassistant这个文件夹 当你安装samba时就知道了
2-1、www文件夹
这个文件夹是用于安装一些 js 文件的文件夹比如大佬们超炫酷的 lovelace 没有自己创建,复制后要在这启用,打开你的 概览---右上角3个点配置UI---右上角3个点原始配置编辑器
resources:
  - type: js
    url: /local/list-card.js?v=0
  - type: module
    url: /local/custom-lovelace/hf_weather-card/hf_weather-card.js
  - type: module
    url: /local/custom-lovelace/hf_weather-card/hf_weather-more-info.js
  - type: module
    url: /local/button-card/dist/button-card.js
  - type: module
    url: /local/cn-map-card.js?v=0.0.1
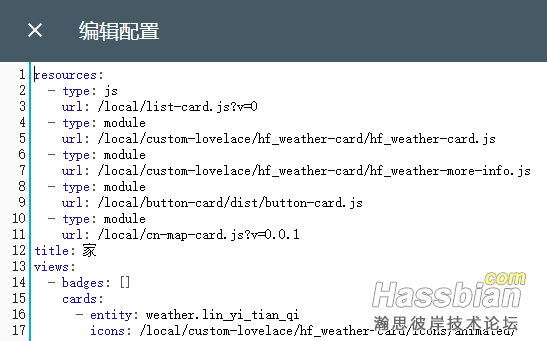
这样就加载好了
2-2、packages文件夹
这个文件夹存放的是一些独立的yaml文件方便管理,当然了你要先在 configuration.yaml 这里添加这么个语句
homeassistant:
  packages: !include_dir_named packages
2-3、samba安装
按这个的好处就是可以在电脑映射网络驱动器直接编辑修改

插件库里直接安装、打开、配置config、start、电脑里去映射吧(有时你可能在网络里找不到,直接输入 \\192.168.123.233 你的ip就行,然后右键映射)
{
  "workgroup": "WORKGROUP",
  "username": "hassio",
  "password": "miku855581",
  "interface": "eth0",  # 这里我是网线连接
  "allow_hosts": [
    "10.0.0.0/8",
    "172.16.0.0/12",
    "192.168.123.0/16"
  ]
}

2-4、ios-homekit
现在直接集成了,也不需要按啥了直接配置文件configuration.yaml 里添加
为了方便管理我们可以这样写
homekit: !include homekit.yaml
然后新建一个homekit.yaml(同configuration.yaml文件目录)方便管理,有时候你想只显示这几个,或者不显示这几个就可以
  filter:
    include_entities:
      - switch.phicomm_dc1_logo_light
      - switch.phicomm_dc1_switch0
      - switch.phicomm_dc1_switch1
      - switch.phicomm_dc1_switch2
      - switch.phicomm_dc1_switch3
就像这样,只显示这几个,其他的都屏蔽掉
2-5、针对特定的用户设置不同的显示菜单 Compact Custom Header
https://bbs.hassbian.com/thread-8035-1-1.html 虽然大佬给了名字 但是我的ha中没有那个库只能GitHub下载下面附上附件以及链接https://github.com/maykar/compact-custom-header(升级了0.102出现问题了图标重叠了)
resources:
  - type: module
    url: /local/compact-custom-header-master/compact-custom-header.js?v=0.0.1
2-6、hacs的安装见2楼 (强烈推荐,功能越来越完善了,而且方便很多很多)
3、我的一些设备
3-1、易微联硬改DC1
https://bbs.hassbian.com/thread-6282-1-1.html
https://github.com/peterbuga/HASS-sonoff-ewelink
有些人配置可能会写错这里我还是贴一下吧
直接修改你的账号密码就行了
sonoff:
  username: '+8612345678901'
  password: 12345678
  scan_interval: 60
  grace_period: 600
  api_region: 'cn'
  entity_prefix: True
  debug: False
3-2、DC1劫持
怎么劫持?每个路由都不一样大佬帖子都有介绍比如
192.168.123.233 aircat.phicomm.com
最近看到的帖子都是好久以前的,各种尝试结果都劫持失败,最终是群里大佬给的配置,成功劫持附件还是来这里下载吧
https://bbs.hassbian.com/thread-7972-1-1.html
3-3、没错还是DC1这次是刷机的
这个没啥好说的就那样,不过这个界面挺好的https://bbs.hassbian.com/thread-7618-1-1.html大佬安装讲的也很详细
刷机帖子在这里https://bbs.hassbian.com/thread-6628-1-1.html
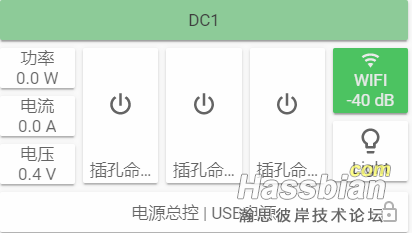
加个小标题 需要的把下面的代码放在途中位置
  - color: 'rgb(141, 203, 152)'
    color_type: card
    name: DC1
    styles:
      card:
        - height: 40px
    type: 'custom:button-card'
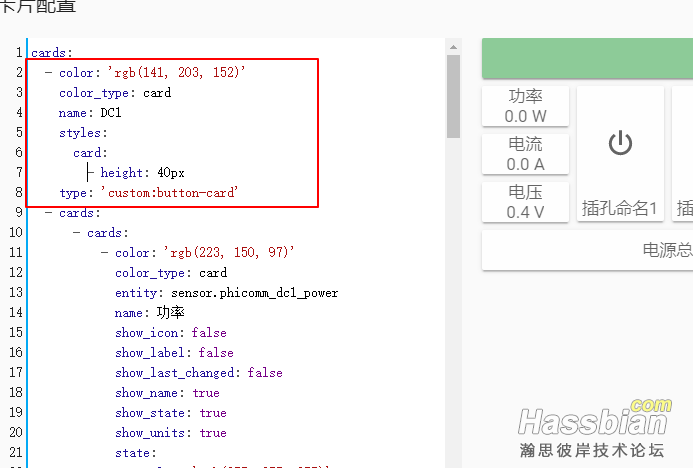
然后咱还有个劫持的DC1也采用了这个界面
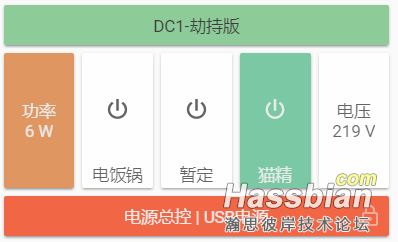
代码在这
cards:
  - color: 'rgb(141, 203, 152)'
    color_type: card
    name: DC1-劫持版
    styles:
      card:
        - height: 40px
    type: 'custom:button-card'
  - cards:
      - cards:
          - color: 'rgb(223, 150, 97)'
            color_type: card
            entity: sensor.dc1_keting_p
            name: 功率
            show_icon: false
            show_label: false
            show_last_changed: false
            show_name: true
            show_state: true
            show_units: true
            state:
              - color: 'rgb(255, 255, 255)'
                operator: <
                styles:
                  card:
                    - filter: opacity(80%)
                  icon:
                    - filter: grayscale(100%)
                value: 0.1
            styles:
              card:
                - height: 135px
            type: 'custom:button-card'
        type: vertical-stack
      - color: 'rgb(146, 180, 97)'
        color_type: card
        entity: switch.dc1_keting_s1
        entity_picture: /local/image/image5-1.jpg
        icon: 'mdi:power'
        lock: false
        name: 电饭锅
        show_entity_picture: false
        show_icon: true
        show_label: false
        show_last_changed: false
        show_name: true
        show_state: false
        show_units: true
        state:
          - styles:
              card:
                - filter: opacity(80%)
              icon:
                - filter: grayscale(100%)
            value: 'off'
        styles:
          card:
            - height: 135px
        type: 'custom:button-card'
      - color: 'rgb(146, 140, 150)'
        color_type: card
        entity: switch.dc1_keting_s2
        entity_picture: /local/image/image5-1.jpg
        icon: 'mdi:power'
        lock: false
        name: 暂定
        show_entity_picture: false
        show_icon: true
        show_label: false
        show_last_changed: false
        show_name: true
        show_state: false
        show_units: true
        state:
          - styles:
              card:
                - filter: opacity(80%)
              icon:
                - filter: grayscale(100%)
            value: 'off'
        styles:
          card:
            - height: 135px
        type: 'custom:button-card'
      - color: 'rgb(123, 200, 164)'
        color_type: card
        entity: switch.dc1_keting_s3
        entity_picture: /local/image/image5-1.jpg
        icon: 'mdi:power'
        lock: false
        name: 猫精
        show_entity_picture: false
        show_icon: true
        show_label: false
        show_last_changed: false
        show_name: true
        show_state: false
        show_units: true
        state:
          - styles:
              card:
                - filter: opacity(80%)
              icon:
                - filter: grayscale(100%)
            value: 'off'
        styles:
          card:
            - height: 135px
        type: 'custom:button-card'
      - cards:
          - color: 'rgb(106, 180, 197)'
            color_type: card
            entity: sensor.dc1_keting_v
            name: 电压
            show_icon: false
            show_label: false
            show_last_changed: false
            show_name: true
            show_state: true
            show_units: true
            state:
              - color: 'rgb(255, 255, 255)'
                operator: <
                styles:
                  card:
                    - filter: opacity(80%)
                  icon:
                    - filter: grayscale(100%)
                value: 220
            styles:
              card:
                - height: 135px
            type: 'custom:button-card'
        type: vertical-stack
    type: horizontal-stack
  - color: 'rgb(241, 103, 69)'
    color_type: card
    entity: switch.dc1_keting
    entity_picture: /local/image/image5-1.jpg
    lock: true
    name: 电源总控 | USB电源
    show_entity_picture: false
    show_icon: false
    show_label: false
    show_last_changed: false
    show_name: true
    show_state: false
    show_units: true
    state:
      - styles:
          card:
            - filter: opacity(80%)
          icon:
            - filter: grayscale(100%)
        value: 'off'
    styles:
      card:
        - height: 40px
    type: 'custom:button-card'
title: 刷机DC1
type: vertical-stack
缩进有点小麻烦不知道咋回事
 card.zip
(835 Bytes, 下载次数: 16)
3-4、有点炫酷的天气插件
https://bbs.hassbian.com/thread-7054-1-1.html 我用的小时显示结果ios不显示小时。。。天倒是没问题,是不是ios不支持还是咋回事,希望看到的大佬可以帮我解答一下。
配置文件 configuration.yaml 我是这样写的好像是不能{{}}这个会报错
weather:
  - platform: hf_weather
    name: Linyi
    city: CN101120901
    appkey: xxxxxxxxxxxxxxxxxxxxxxxxxx
Lovelace里 好像随便新建一个小卡片然后切换编辑器直接粘贴就行,还有一些参数参看大佬帖子
entity: weather.lin_yi_tian_qi
icons: /local/custom-lovelace/hf_weather-card/icons/animated/
mode: daily
type: 'custom:hf_weather-card'
3-5、斐讯M1劫持
也是论坛里没找到合适的配置文件,又是找的大佬要的。。。附上附件
 M1.zip
(17.8 KB, 下载次数: 518)
3-6、博联黑豆
(也是大佬给的这里这里https://bbs.hassbian.com/forum.php?mod=viewthread&tid=7974&page=1#pid252733)
配置文件configuration.yaml中
 smartir.rar
(27.66 KB, 下载次数: 96)
switch:
  - platform: broadlink
    host: 192.168.123.11
    mac: 'XX:XX:XX:XX:XX:XX'
    timeout: 15

smartir:
climate:
  - platform: smartir
  device_code: 9999 #要跟上面提到的/custom_components/smartir/codes/climate/9999.json文件名的数字一致
  controller_data: 192.168.123.11 #你的黑豆内网ip
附件放在custom_components文件夹里
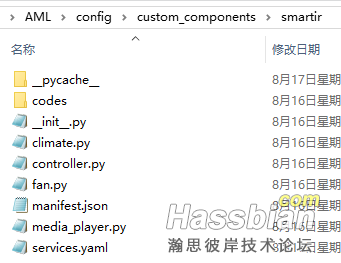
学码这是很重要的
看这里:开发者工具---服务---broadlink.learn
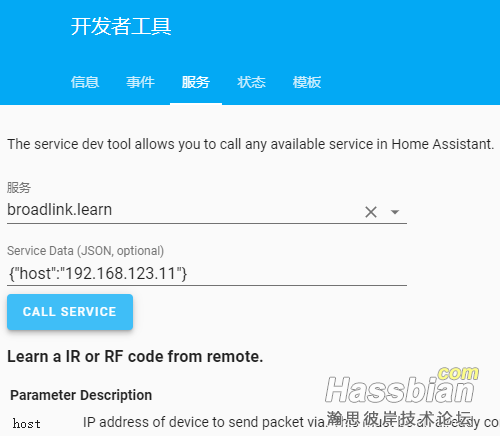
{"host":"192.168.123.11"}
然后呼叫你就会看到你的黑豆灯亮了,开始吧遥控器对着它按,你就会收到一条通知,这个就是我们需要的红外码
位置custom_components\smartir\codes\climate\9999.json
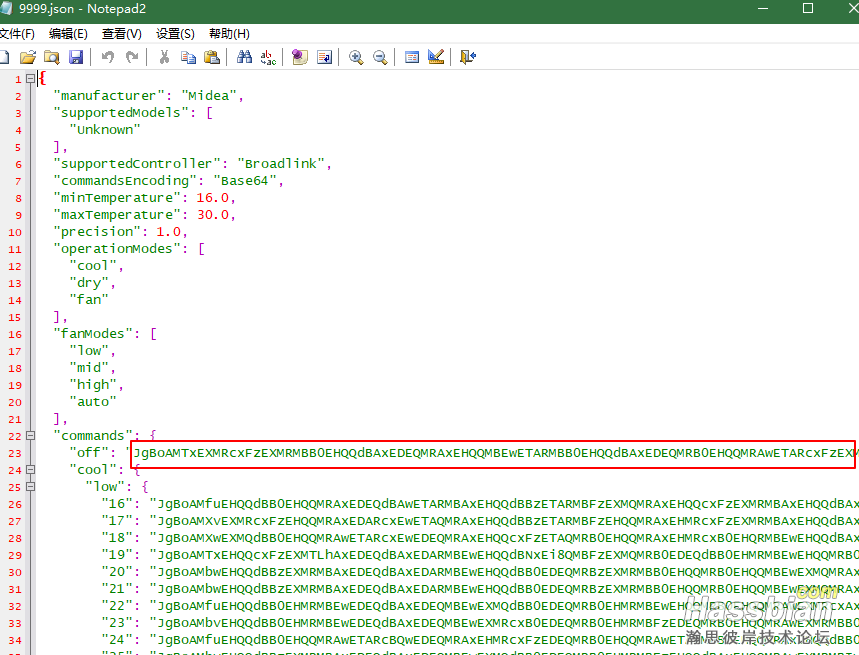
替换相应的码就ok啦 Lovelace新建小卡片左下角 THRMOSTAT成品是下面这样的

3-7、旧手机当作监控摄像头
参考 https://bbs.hassbian.com/thread-5268-1-1.html
好像是直接就能用反正我是直接写的配置文件configuration.yaml
android_ip_webcam:
  - host: 192.168.123.12
    name: oneplus
    sensors:
      - audio_connections
      - video_connections
      - battery_level
      - battery_temp
      - light
      - motion
      - pressure
    switches:
      - exposure_lock
      - ffc
      - focus
      - gps_active
      - night_vision
      - overlay
      - torch
      - whitebalance_lock
      - video_recording
    motion_sensor: TRUE
配置小卡片Lovelace
新建小卡片 切换编辑器 粘贴 可以实时显示画面参考https://www.home-assistant.io/lovelace/picture-entity/#configuration-variables
camera_view: live
entity: camera.oneplus
type: picture-entity
不过手机发热有点严重还是玩玩就好体验一下,还是买摄像头吧
3-8、新买的摄像头快要到了
链接先附上到货开搞https://bbs.hassbian.com/thread-7752-1-1.html 首先感谢大佬的抓包,让我们这种啥都不懂的小白也能玩的高大上,大佬帖子里也有写具体的安装教程,可能过于简单懂得自然懂,但是我这种Linux都没接触过的人看着就比较蒙了,经过到处咨询大佬百度google,暂时实现了代码控制云台,为了让自己记住,也方便像我一样的小白,在这里我在稍微啰嗦一下,大佬请轻喷。
1、安装依赖
我用的是xshell5,连接到你的ha服务器,先说一下,大佬的这个代码是已python2为基础的,python3不行,我用自带的工具转过码但是还是出错,奈何咱没学过python只能期待大佬写一个3的,暂时用2吧,
来来来先看看你有没有python2

出现版本号就是有的,没有就自己安装下吧,百度有很简单
然后是安装依赖
pip install requests
pip install rsa
然后按大佬的代码接入ha接下来就是重头戏了,代码空竹云台转动再次感谢大佬抓包
最好把代码复制出来,自己新建一个文本文档复制粘贴也快
// lens mask 镜头遮蔽
python mipcc.py admin chen1992 http://192.168.123.17:80 '{"method":"set","lens_mask":{"lens_mask_info":{"enabled":"on"}}}'
// lens mask 镜头遮蔽打开
python mipcc.py admin chen1992 http://192.168.123.17:80 '{"method":"set","lens_mask":{"lens_mask_info":{"enabled":"off"}}}'
这个大佬只给了遮蔽,没给打开。。。。这里补充一下
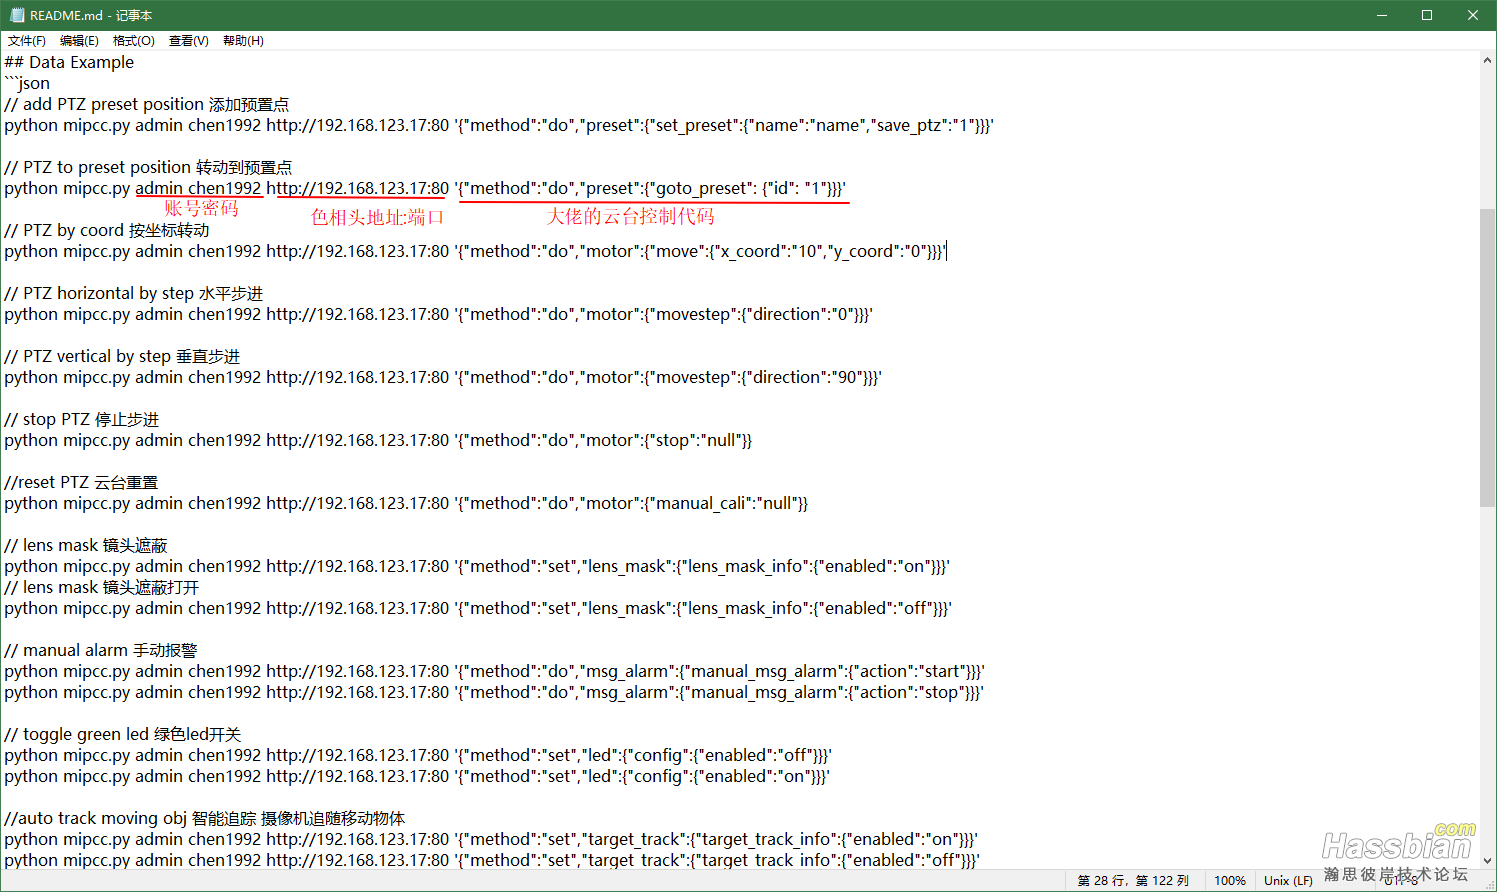
看图,直接修改成你的信息就行了
执行代码的时候一定要记得cd到你的 mipcc.py 文件存放的位置,因为我放在root文件夹里的,root登录,不需要cd
然后是预设点的说明

建议直接在app里设置,因为代码设置的不显示画面,然后有个代码
// PTZ to preset position 转动到预置点
python mipcc.py admin chen1992 http://192.168.123.17:80 '{"method":"do","preset":{"goto_preset": {"id": "1"}}}'
改动这里{"id": "1"}}}'的1就行了对应位置如图闲着没事测出来的
然后原帖评论区有用cover卡片做的面板,但是咱没成功(后来我成功了见这里吧https://bbs.hassbian.com/thread-8717-1-1.html)
// add PTZ preset position 添加预置点
python mipcc.py admin chen1992 http://192.168.123.17:80 '{"method":"do","preset":{"set_preset":{"name":"name","save_ptz":"1"}}}'

// PTZ to preset position 转动到预置点
python mipcc.py admin chen1992 http://192.168.123.17:80 '{"method":"do","preset":{"goto_preset": {"id": "1"}}}'

// PTZ by coord 按坐标转动
python mipcc.py admin chen1992 http://192.168.123.17:80 '{"method":"do","motor":{"move":{"x_coord":"10","y_coord":"0"}}}'

// PTZ horizontal by step 水平步进
python mipcc.py admin chen1992 http://192.168.123.17:80 '{"method":"do","motor":{"movestep":{"direction":"0"}}}'

// PTZ vertical by step 垂直步进
python mipcc.py admin chen1992 http://192.168.123.17:80 '{"method":"do","motor":{"movestep":{"direction":"90"}}}'

// stop PTZ 停止步进
python mipcc.py admin chen1992 http://192.168.123.17:80 '{"method":"do","motor":{"stop":"null"}}

//reset PTZ 云台重置
python mipcc.py admin chen1992 http://192.168.123.17:80 '{"method":"do","motor":{"manual_cali":"null"}}

// lens mask 镜头遮蔽
python mipcc.py admin chen1992 http://192.168.123.17:80 '{"method":"set","lens_mask":{"lens_mask_info":{"enabled":"on"}}}'
// lens mask 镜头遮蔽打开
python mipcc.py admin chen1992 http://192.168.123.17:80 '{"method":"set","lens_mask":{"lens_mask_info":{"enabled":"off"}}}'

// manual alarm 手动报警
python mipcc.py admin chen1992 http://192.168.123.17:80 '{"method":"do","msg_alarm":{"manual_msg_alarm":{"action":"start"}}}'
python mipcc.py admin chen1992 http://192.168.123.17:80 '{"method":"do","msg_alarm":{"manual_msg_alarm":{"action":"stop"}}}'

// toggle green led 绿色led开关
python mipcc.py admin chen1992 http://192.168.123.17:80 '{"method":"set","led":{"config":{"enabled":"off"}}}'
python mipcc.py admin chen1992 http://192.168.123.17:80 '{"method":"set","led":{"config":{"enabled":"on"}}}'

//auto track moving obj 智能追踪 摄像机追随移动物体
python mipcc.py admin chen1992 http://192.168.123.17:80 '{"method":"set","target_track":{"target_track_info":{"enabled":"on"}}}'
python mipcc.py admin chen1992 http://192.168.123.17:80 '{"method":"set","target_track":{"target_track_info":{"enabled":"off"}}}'

//alarm if found moving obj 检测到移动物体时报警
python mipcc.py admin chen1992 http://192.168.123.17:80 '{"method":"set","msg_alarm":{"chn1_msg_alarm_info":{"enabled":"on","alarm_type":"0","alarm_mode":["sound"]}}}'
python mipcc.py admin chen1992 http://192.168.123.17:80 '{"method":"set","msg_alarm":{"chn1_msg_alarm_info":{"enabled":"on","alarm_type":"0","alarm_mode":["light"]}}}'
python mipcc.py admin chen1992 http://192.168.123.17:80 '{"method":"set","msg_alarm":{"chn1_msg_alarm_info":{"enabled":"on","alarm_type":"0","alarm_mode":["sound","light"]}}}'
python mipcc.py admin chen1992 http://192.168.123.17:80 '{"method":"set","msg_alarm_plan":{"chn1_msg_alarm_plan":{"enabled":"on","alarm_plan_1":"0000-0000%2c127"}}}'

//motion detection 移动侦测 与 侦测灵敏度
python mipcc.py admin chen1992 http://192.168.123.17:80 '{"method":"set","motion_detection":{"motion_det":{"enabled":"off"}}}'
python mipcc.py admin chen1992 http://192.168.123.17:80 '{"method":"set","motion_detection":{"motion_det":{"enabled":"on"}}}'
python mipcc.py admin chen1992 http://192.168.123.17:80 '{"method":"set","motion_detection":{"motion_det":{"digital_sensitivity":"20"}}}'
python mipcc.py admin chen1992 http://192.168.123.17:80 '{"method":"set","motion_detection":{"motion_det":{"digital_sensitivity":"50"}}}'
python mipcc.py admin chen1992 http://192.168.123.17:80 '{"method":"set","motion_detection":{"motion_det":{"digital_sensitivity":"80"}}}'

//enable record and plan 是否录制与录制计划
python mipcc.py admin chen1992 http://192.168.123.17:80 '{"method":"set","record_plan":{"chn1_channel":{"enabled":"off","monday":"%5b%220000-2400%3a2%22%5d","tuesday":"%5b%220000-2400%3a2%22%5d","wednesday":"%5b%220000-2400%3a2%22%5d","thursday":"%5b%220000-2400%3a2%22%5d","friday":"%5b%220000-2400%3a2%22%5d","saturday":"%5b%220000-2400%3a2%22%5d","sunday":"%5b%220000-2400%3a2%22%5d"}}}'
python mipcc.py admin chen1992 http://192.168.123.17:80 '{"method":"set","record_plan":{"chn1_channel":{"enabled":"on","monday":"%5b%220000-2400%3a2%22%5d","tuesday":"%5b%220000-2400%3a2%22%5d","wednesday":"%5b%220000-2400%3a2%22%5d","thursday":"%5b%220000-2400%3a2%22%5d","friday":"%5b%220000-2400%3a2%22%5d","saturday":"%5b%220000-2400%3a2%22%5d","sunday":"%5b%220000-2400%3a2%22%5d"}}}'

//reboot and timing reboot 重启与定时重启
python mipcc.py admin chen1992 http://192.168.123.17:80 '{"method":"do","system":{"reboot":"null"}}
python mipcc.py admin chen1992 http://192.168.123.17:80 '{"method":"set","timing_reboot":{"reboot":{"enabled":"off","day":"7","time":"03%3a00%3a00"}}}'
python mipcc.py admin chen1992 http://192.168.123.17:80 '{"method":"set","timing_reboot":{"reboot":{"enabled":"on","day":"7","time":"03%3a00%3a00"}}}'

//greetings 个性语音提示
python mipcc.py admin chen1992 http://192.168.123.17:80 '{"method":"set","greeter":{"chn1_greeter_ctrl":{"enabled":"on"}}}'
python mipcc.py admin chen1992 http://192.168.123.17:80 '{"method":"set","greeter":{"chn1_greeter_ctrl":{"enabled":"off"}}}'
//greeting volume 音量
python mipcc.py admin chen1992 http://192.168.123.17:80 '{"method":"set","greeter":{"chn1_greeter_audio":{"enter_volume":"77","leave_volume":"77"}}}'
//play greetings 播放语音
python mipcc.py admin chen1992 http://192.168.123.17:80 '{"method":"do","greeter":{"test_audio":{"force":"1"}}}' 播放默认语音
python mipcc.py admin chen1992 http://192.168.123.17:80 '{"method":"do","greeter":{"test_audio":{"id":"4096","force":"1"}}}' 播放指定语音
//id
//0 无
//12288 你好
//4096-4104 依次为 你好欢迎光临 .....
//set enter or leave greetings 设置进入或离开语音
python mipcc.py admin chen1992 http://192.168.123.17:80 '{"method":"set","greeter":{"chn1_greeter_audio":{"enter_audio_id":"0"}}}'
python mipcc.py admin chen1992 http://192.168.123.17:80 '{"method":"set","greeter":{"chn1_greeter_audio":{"leave_audio_id":"4104"}}}'
所有代码都粘贴来了,直接替换就行了
| 

