|
|
本帖最后由 消逝 于 2024-8-9 21:01 编辑
更新:文本左右对齐方式:使用这个效果更好一些:text-align: left
文本上下对齐方式:align-items: top(需要card,设置padding: 0 0 )
文本超长换行,使用white-space: normal
--------------------以下正文--------------------
github地址:GitHub - custom-cards/button-card: ❇️ Lovelace button-card for home assistant
插件button_card插件能做什么?
① 基础功能:可以显示【实体属性值state】、【实体名字name】、【实体文本label】、【实体图标icon】、【实体图片entity_picture】、【实体单位units】
② 进阶功能:可以设定【自定义属性variables】
③ 进阶功能:可以嵌套if,按设定条件显示想要数值
④ 进阶功能:可以嵌套简单的css代码,个性化显示到界面 ⑤ 网格布局:按特定网格布局,手搓显示模块必会
1、布局:layout
常用的布局如下:
vertical(默认布局)、icon_name_state、name_state、icon_name、icon_state、icon_label
结合show_xxxx,决定最终将显示什么及布局时什么样
show_state: true #实体数值:true显示,false不显示
show_name: true #实体名字:true显示,false不显示
show_label: true #实体文本:true显示,false不显示
show_icon: true #实体图标:true显示,false不显示
show_units: true #实体单位:true显示,false不显示
show_entity_picture: true #实体图片:true显示,false不显示 布局格式:
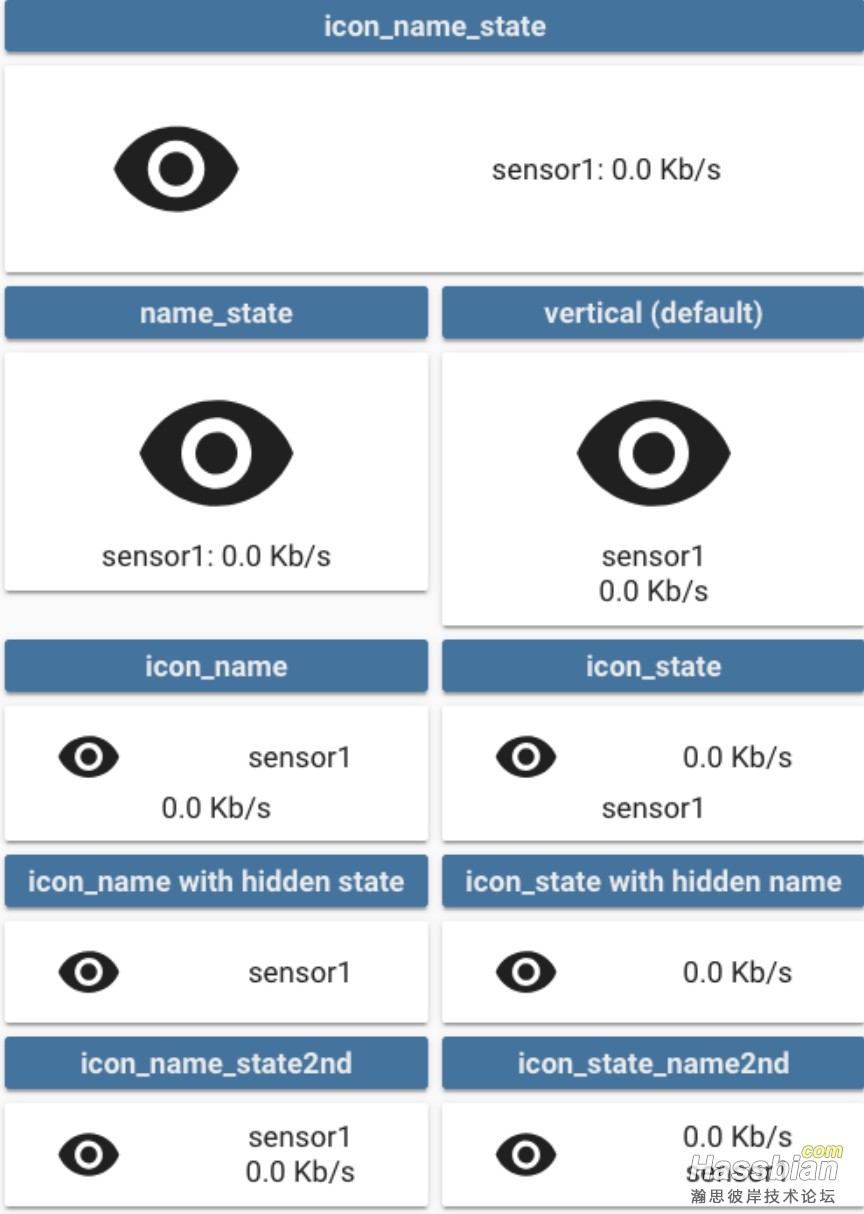
          - type: custom:button-card
            entity: fan.jinghuaqi_keting
            layout: vertical
            show_state: true
            show_name: true
            show_label: true
            show_icon: true
            show_units: true
            show_entity_picture: true
            style:
              top: 20%
              left: 30%
              width: 100px
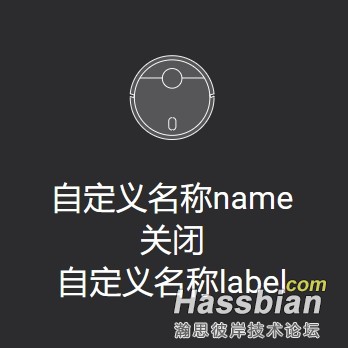
2、属性重定义:可以按照自己需要重定义属性(注:图片的优先级高于icon)
          - type: custom:button-card
            entity: fan.jinghuaqi_keting
            layout: vertical
            show_state: true
            show_name: true
            show_label: true
            show_icon: true
            show_units: true
            show_entity_picture: true
            name: "自定义名称name"
            label: "自定义名称label"
            units: "自定义单位"
            entity_picture: /local/UI/扫地机器人/扫地机器人-停靠.svg
            style:
              top: 20%
              left: 30%
              width: 200px
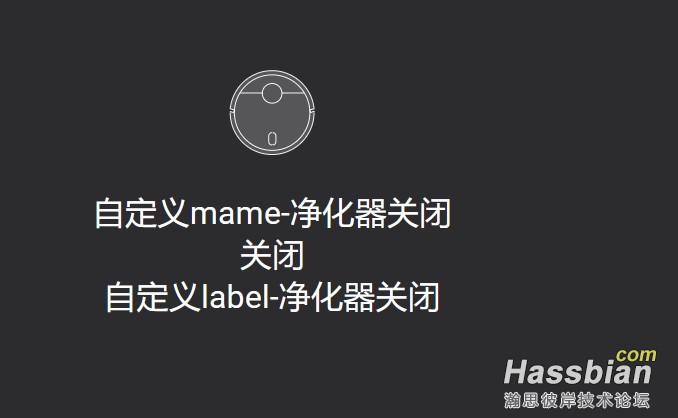
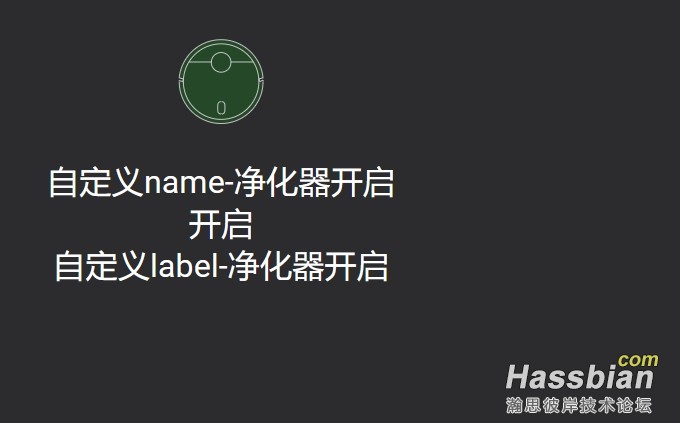
3、属性重定义:高级应用,嵌套if,这样就可以根据实体属性state的值来变化相应的属性
          - type: custom:button-card
            entity: fan.jinghuaqi_keting
            layout: vertical
            show_state: true
            show_name: true
            show_label: true
            show_icon: true
            show_units: true
            show_entity_picture: true
            name: |
              [[[
                if (entity.state =='off') return '自定义mame-净化器关闭';
                if (entity.state =='on')  return '自定义name-净化器开启';
              ]]]
            label: |
              [[[
                if (entity.state =='off') return '自定义label-净化器关闭';
                if (entity.state =='on')  return '自定义label-净化器开启';
              ]]]
            units: |
             [[[
                if (entity.state =='off') return '自定义units-净化器关闭';
                if (entity.state =='on')  return '自定义units-净化器开启';
              ]]]
            entity_picture: |
              [[[
                if (entity.state =='off') return '/local/UI/扫地机器人/扫地机器人-停靠.svg';
                if (entity.state =='on')  return '/local/UI/扫地机器人/扫地机器人-清扫.svg';
              ]]]
            style:
              top: 20%
              left: 30%
              width: 200px
3、样式自定义,只列出了常用的,更多内容搜索css代码扩展 我列举了几乎所有可能用到的,部分内容可以举一反三,也可以添加css代码,实际使用按需使用
其中name、state、label都是文本类,是通用的,我只列举部分其中icon、entity_picture都是图片类,是通用的,我只列举部分,注:icon可以定义颜色
其中card里的部分代码也是可以给其他通用的
其中部分是可以做动画的,常用的旋转动画、闪烁动画,对对对,你没看错,就是动画
(注:动画有2种实现方式,一种是代码里实现,一种是使用动图gif或者svg)
          - type: custom:button-card
            entity: fan.jinghuaqi_keting
            layout: vertical
            show_state: true
            show_name: true
            show_label: true
            show_icon: true
            show_units: true
            show_entity_picture: true
            name: "自定义名称name"
            label: "自定义名称label"
            units: "自定义单位"
            #entity_picture: /local/UI/扫地机器人/扫地机器人-停靠.svg
            style:
              top: 50%
              left: 30%
              width: 200px
            styles:
              card:
                #- background: rgba(255,0,0,0.3)   #普通背景色 rgba(r,g,b,透明度),#AAAAAA05,red/blue等也支持
                #                                  #渐变背景色linear-gradient渐变色
                - background: >-
                    linear-gradient(to bottom right,rgb(85,120,150),rgb(12,39,66))
                - width: 400px          # 卡片宽度
                - height: 200px         # 卡片高度
                - border-radius: 10px   #卡片圆角大小
                - border: 8px solid     #卡片边框大小
                - border-color: blue    #卡片边框颜色
                - border-style: dotted  #卡片边框样式:dotted点、dashed虚线、solid实线、double双边框、3D边框(groove、ridge、inset、outset)
                - filter: hue-rotate(10deg)  #背景色的色相(分享帖里的自动变化颜色就是应用这个)
                - transform: rotate(0deg) #卡片旋转90度
                #- animation: blink 1.5s ease infinite  #添加动画,1.5秒间隔闪烁,截图不出来,自己测试看效果
                #- animation: rotating 1.5s linear infinite #添加动画,1.5秒间隔旋转,截图不出来,自己测试看效果
              icon:
                - width: 100px        #图标宽度
                - height: 100px       #图标高度
                - margin-left: 10px   #左边距,左右偏移位置,用于微调左右位置
                - margin-top: 10px    #上边距,上下偏移位置,用于微调上下位置
                - justify-self: start # 对齐方式,start左对齐、center居中对齐、end右对齐、left左对齐、right右对齐
                - background: red     #图标背景色
                - color: white        #图标前景色,图标颜色
                - transform: rotate(90deg) #图标旋转90度
                - animation: rotating 1.5s linear infinite #添加动画,1.5秒间隔旋转,截图不出来,自己测试看效果
              name:
                - color: rgba(255,255,255,0.8)  #文本颜色
                - font-size: 20px               #文本字体大小
                - font-weight: bold             #文本字体宽度,normal:正常粗细=400、bold加粗=700、也可以800、1000这种数值
                - justify-self: center          #文本对齐方式,start左对齐、center居中对齐、end右对齐、left左对齐、right右对齐
                - margin-left: 10px             #左边距,左右偏移位置,用于微调左右位置
                - margin-top: 10px              #上边距,上下偏移位置,用于微调上下位置
                - text-shadow: 0 0.5px black, 0.5px 0 black, -0.5px 0 black, 0 -0.5px black #文本边框0.5,本质是阴影
              label:
                - color: rgba(255,255,255,0.8)
                - font-size: 13px
                #同name部分
              state:
                - color: white
                - font-size: 22px
                #同name部分
              entity_picture:
                #同icon部分
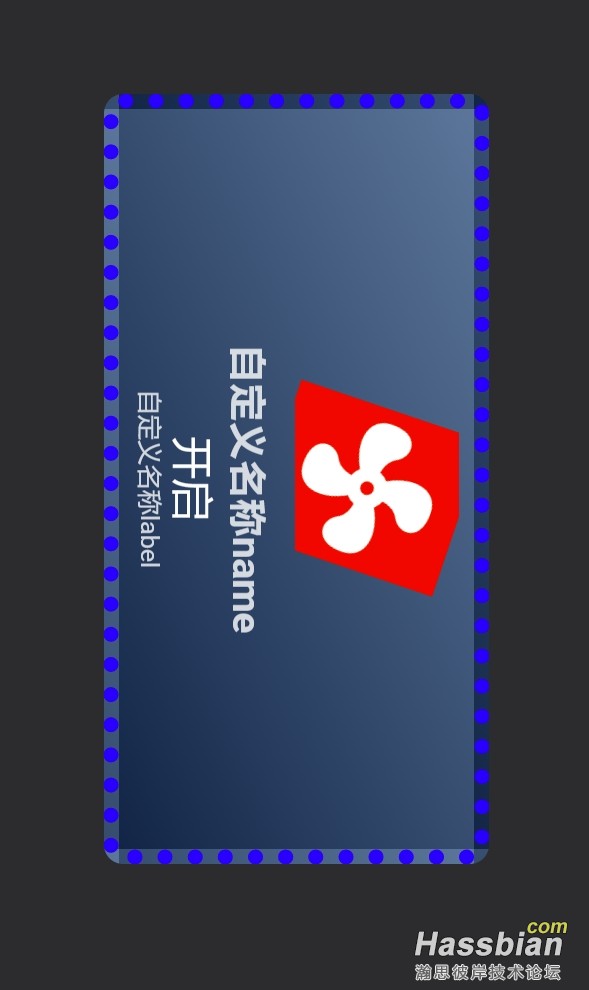
4、样式自定义,同样兼容if嵌套比如card卡片背景,根据实体数值的大小显示不同的颜色,如温度卡片背景,根据温度显示蓝、绿、橙、红背景色,直观显示温度
            styles:
              card:
                - background: |
                    [[[
                        if (entity.state <  -10 )                      return 'rgba(0,0,255,0.3)';
                        if (entity.state >= -10 && entity.state <  0)  return 'rgba(30,144,255,0.3)';
                        if (entity.state >= 0   && entity.state < 10)  return 'rgba(0,191,255,0.3)';
                        if (entity.state >= 10  && entity.state < 15)  return 'rgba(0,255,255,0.3)';
                        if (entity.state >= 15  && entity.state < 20)  return 'rgba(0,255,127,0.3)';
                        if (entity.state >= 20  && entity.state < 24)  return 'rgba(0,255,0,0.3)';
                        if (entity.state >= 24  && entity.state < 27)  return 'rgba(173,255,47,0.3)';
                        if (entity.state >= 27  && entity.state < 30)  return 'rgba(255,215,0,0.3)';
                        if (entity.state >= 30  && entity.state < 33)  return 'rgba(255,140,0,0.3)';
                        if (entity.state >= 33  && entity.state < 36)  return 'rgba(255,69,0,0.3)';
                        if (entity.state >= 36  && entity.state < 39)  return 'rgba(255,0,0,0.3)';
                        if (entity.state >= 39 )                       return 'rgba(139,0,0,0.3)';
                    ]]]
5、我们发现定义的东西越多,代码就越长,这时我们可以使用button模板来简化代码,及可读性 这是一个完整代码,格式错误的可以直接复制这个
views:
  - type: panel
    cards:
      - type: picture-elements
        image: /local/UI/null.png
        elements:
          - type: custom:button-card
            entity: sensor.wendu_ciwo
            template: wendubeijing   #调用模板
            variables:
              width: 50px
              height: 50px
              font_size: 12px
            style:
              top: 200px
              left: 400px
          - type: custom:button-card
            entity: sensor.wendu_zhuwo
            template: wendubeijing   #调用模板
            variables:
              width: 50px
              height: 50px
              font_size: 12px
            style:
              top: 300px
              left: 400px
          - type: custom:button-card
            entity: sensor.wendu_keting
            template: wendubeijing   #调用模板
            show_units: true
            variables:
              width: 50px
              height: 50px
              font_size: 12px
            style:
              top: 400px
              left: 400px
button_card_templates:  ###button模板开头,顶格写
  wendubeijing:         ###button模板定义,下面就是常规代码,这是一个温度背景颜色
    show_icon: false
    show_name: false
    show_label: false
    show_state: true
    show_units: false
    styles:
      card:
        - width: '[[[ return  variables.width ]]]'
        - height: '[[[ return  variables.height ]]]'
        - border-radius: 0px
        - border: 0px solid
        - background: |
            [[[
                if (entity.state <  -10 )                      return 'rgba(0,0,255,0.3)';
                if (entity.state >= -10 && entity.state <  0)  return 'rgba(30,144,255,0.3)';
                if (entity.state >= 0   && entity.state < 10)  return 'rgba(0,191,255,0.3)';
                if (entity.state >= 10  && entity.state < 15)  return 'rgba(0,255,255,0.3)';
                if (entity.state >= 15  && entity.state < 20)  return 'rgba(0,255,127,0.3)';
                if (entity.state >= 20  && entity.state < 24)  return 'rgba(0,255,0,0.3)';
                if (entity.state >= 24  && entity.state < 27)  return 'rgba(173,255,47,0.3)';
                if (entity.state >= 27  && entity.state < 30)  return 'rgba(255,215,0,0.3)';
                if (entity.state >= 30  && entity.state < 33)  return 'rgba(255,140,0,0.3)';
                if (entity.state >= 33  && entity.state < 36)  return 'rgba(255,69,0,0.3)';
                if (entity.state >= 36  && entity.state < 39)  return 'rgba(255,0,0,0.3)';
                if (entity.state >= 39 )                       return 'rgba(139,0,0,0.3)';
            ]]]
      state:
        - text-shadow: 0 0.5px black, 0.5px 0 black, -0.5px 0 black, 0 -0.5px black
        - font-weight: bold
        - font-size: '[[[ return  variables.font_size ]]]'
        - color: white
        - justify-self: center
6、自定义属性variables,和模板可以很好的结合 调用模板时,不可避免的,我们可能不会使用完全相同的模板。这时可以多做一些模板。但是终究还是比较麻烦,那么这个时候我们就可以引用自定义属性,针对不同处的处理
这里支持if,也支持直接返回,看是实际使用情况
views:
  - type: panel
    cards:
      - type: picture-elements
        image: /local/UI/null.png
        elements:
          - type: custom:button-card
            entity: sensor.wendu_ciwo
            template: wendubeijing   #调用模板
            variables:     #自定义属性
              width: 50px
              height: 50px
              abc: 净化器
            style:
              top: 200px
              left: 400px
          - type: custom:button-card
            entity: sensor.wendu_ciwo
            template: wendubeijing   #调用模板
            variables:     #自定义属性
              width: 50px
              height: 50px
              abc: 加湿器
            style:
              top: 300px
              left: 400px
button_card_templates:  ###button模板开头,顶格写
  wendubeijing:         ###button模板定义,下面就是常规代码,这是一个温度背景颜色
    show_icon: false
    show_name: false
    show_label: false
    show_state: true
    show_units: false
    styles:
      card:
        - width: '[[[ return  variables.width ]]]'   #自定义属性宽度,直接返回值
        - height: '[[[ return  variables.height ]]]' #自定义属性宽度,直接返回值
        - border-radius: 0px
        - border: 0px solid
        - background: |
            [[[
                if (variables.abc =='净化器') return 'red';    #自定义属性,净化器显示红色
                if (variables.abc =='加湿器')  return 'blue';  #自定义属性,加湿器显示蓝色
            ]]]
      state:
        - text-shadow: 0 0.5px black, 0.5px 0 black, -0.5px 0 black, 0 -0.5px black
        - font-weight: bold
        - font-size: 13px
        - color: white
        - justify-self: center
7、网格布局,手搓模块必备 其实就是将不同的卡片,封装在一个button_card内,比如一个净化器集合,里面包含开关、状态、数值等等,每个位置的固定等
首先是怎么定义布局,通常借助下execl表格

views:
  - type: panel
    cards:
      - type: picture-elements
        image: /local/UI/null.png
        elements:
          - type: custom:button-card
            entity: fan.jinghuaqi_keting
            template: button_back
            style:
              top: 25%
              left: 25%
            custom_fields:
              s:
                card:                                    #引用子卡片
                  type: custom:button-card
                  entity: sensor.jinghuaqi_keting_pm25
                  template: button_state
              u:
                card:
                  type: custom:button-card              #引用子卡片
                  label: µg/m³
                  template: button_label
                  variables:
                    type: unit
              a:
                card:
                  type: custom:button-card              #引用子卡片
                  entity: fan.jinghuaqi_keting
                  template: button_icon
                  variables:
                    mode_name: 开关
                  tap_action:
                    service: script.jinghuaqi_keting_mode_toggle
              b:
                card:                                    #引用子卡片
                  type: custom:button-card
                  entity: sensor.jinghuaqi_keting_mode
                  template: button_icon
                  variables:
                    mode_name: 自动
                  tap_action:
                    service: script.jinghuaqi_keting_mode_auto
              c:
                card:                                     #引用子卡片
                  type: custom:button-card
                  entity: sensor.jinghuaqi_keting_mode
                  template: button_icon
                  variables:
                    mode_name: 睡眠
                  tap_action:
                    service: script.jinghuaqi_keting_mode_sleep
              d:
                card:                                     #引用子卡片
                  type: custom:button-card
                  entity: sensor.jinghuaqi_keting_mode
                  template: button_icon
                  variables:
                    mode_name: 最爱
                  tap_action:
                    service: script.jinghuaqi_keting_mode_favorite
              'n':                                         #引用子卡片
                card:
                  type: custom:button-card
                  label: 客厅净化器
                  template: button_label
                  variables:
                    type: name
              m:                                           #引用子卡片
                card:
                  type: custom:button-card
                  entity: fan.jinghuaqi_keting
                  template: button_icon
                  show_name: false
                  variables:
                    mode_name: 更多
                  tap_action:
                    action: more-info

button_card_templates:
  button_back:
    show_label: false
    show_name: false
    show_icon: false
    show_state: false
    layout: vertical
    tap_action:
      action: none
    hold_action:
      action: none
    styles:
      grid:
        - grid-template-areas: |                      #卡片布局,参考图片5步
            "z1 x s s z"
            "z1 x s s u"
            "z1 a b c d"
            "n n n n m"
        - grid-template-columns: 10% 20% 20% 20% 20%  #卡片横向每列的宽度
        - grid-template-rows: 25% 30% 20% 25%         #卡片纵向每列的高度
      card:
        - background: |
            [[[
                if (entity.state == 'on' )   return 'radial-gradient(rgba(0,15,35,0.5),rgba(0,5,11,0.5))';
                if (entity.state == 'off' )  return 'rgba(0,0,0,0)';
            ]]]
        - border-radius: 100%
        - border: 8px solid
        - border-color:  'rgba(0,139,0,0.9)'
        - width: 216px
        - height: 216px
  button_state:
    show_name: false
    show_icon: false
    show_state: true
    show_units: false
    layout: vertical
    tap_action:
      action: none
    hold_action:
      action: none
    styles:
      card:
        - width: 120px
        - left: -25px
      state:
        - padding: 10px 0 0 0
        - justify-self: center
        - font-weight: bold
        - font-size: 65px
  button_label:
    show_label: true
    layout: vertical
    tap_action:
      action: none
    hold_action:
      action: none
    styles:
      card:
        - width: |
            [[[
                if (variables.type =='name' ) return '200px';
                if (variables.type =='unit' ) return '40px';
            ]]]
      label:
        - justify-self: center
        - font-weight: bold
        - font-size: |
            [[[
                if (variables.type == 'name') return '15px';
                if (variables.type == 'unit') return '13px';
            ]]]
  button_icon:
    show_entity_picture: true
    show_name: true
    show_icon: true
    show_state: false
    name: '[[[ return variables.mode_name]]]'
    layout: vertical
    tap_action:
      action: call-service
    entity_picture: |
      [[[
          if (variables.mode_name =='开关' && entity.state ==  'off') return '/local/UI/净化器/按钮-开机.svg';
          if (variables.mode_name =='开关' && entity.state ==  'on')  return '/local/UI/净化器/按钮-关机.svg';
          if (variables.mode_name =='全关' && entity.state ==  'off') return '/local/UI/净化器/按钮-开机.svg';
          if (variables.mode_name =='全关' && entity.state ==  'on')  return '/local/UI/净化器/按钮-关机.svg';
          if (variables.mode_name =='更多' )                          return '/local/UI/净化器/按钮-更多.svg';
          if (variables.mode_name =='自动' && entity.state ==  'Auto')      return '/local/UI/净化器/按钮-自动-on.svg';
          if (variables.mode_name =='自动' && entity.state !=  'Auto')      return '/local/UI/净化器/按钮-自动-off.svg';
          if (variables.mode_name =='睡眠' && entity.state ==  'Sleep')     return '/local/UI/净化器/按钮-睡眠-on.svg';
          if (variables.mode_name =='睡眠' && entity.state !=  'Sleep')     return '/local/UI/净化器/按钮-睡眠-off.svg';
          if (variables.mode_name =='最爱' && entity.state ==  'Favorite')  return '/local/UI/净化器/按钮-最爱-on.svg';
          if (variables.mode_name =='最爱' && entity.state !=  'Favorite')  return '/local/UI/净化器/按钮-最爱-off.svg';
      ]]]
    styles:
      name:
        - font-size: 10px
      icon:
        - width: 25px
8、差不多就这些了,后续有其他的,也会补充,这个需要自己来回测试
|
评分
-
查看全部评分
|