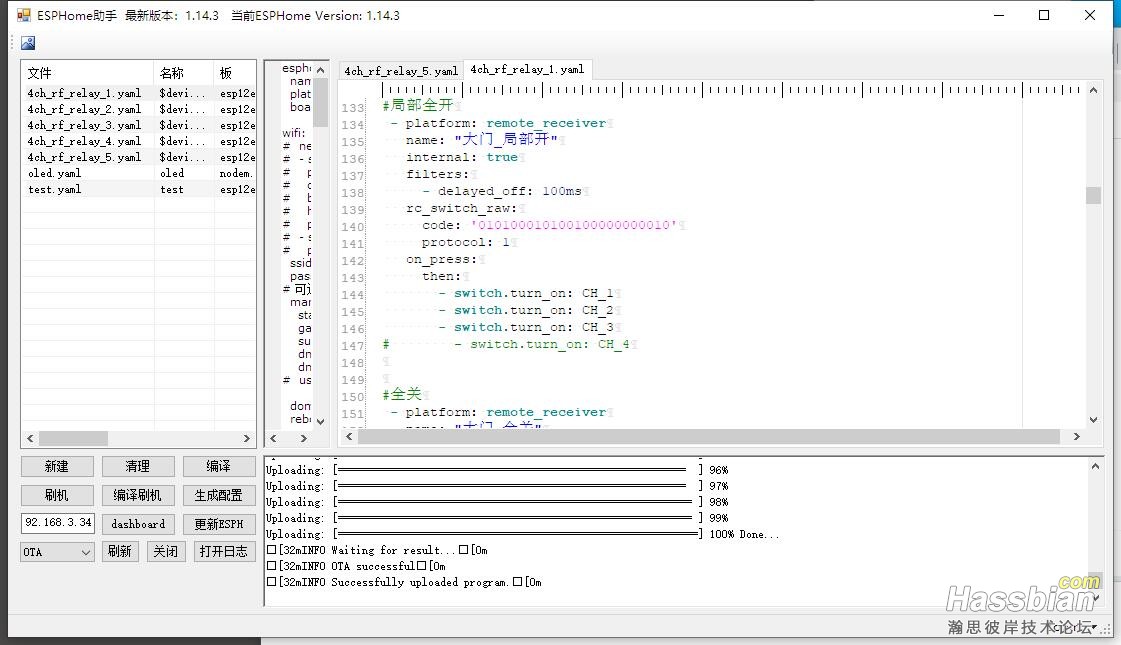
为了和其他设备统一。现程序改用esphome。。并且做了个简单的esphome助手。完成编译刷机和简单编辑功能。
esphome的yaml代码大概如下:
#厨房,餐厅,吧台
substitutions:
  device_name: 4ch_rf_relay_1  #设备名称(多个改成不一样的)
  wifi_ssid: 'wifi'    #WiFi_SSID名称
  wifi_password: '1111111111'    #WiFi密码
  wifi_ssid_AP: '4ch_rf_relay'
  wifi_password_AP: '1111111111'  #ap_WiFi密码
  wifi_static_ip: 192.168.3.30
  wifi_gateway: 192.168.3.1
  wifi_subnet: 255.255.255.0
  wifi_dns1: 192.168.3.1
  wifi_dns2: 192.168.3.1
  wifi_fast_connect: 'false'   #如果SSID是隐藏的,设置为true
  wifi_reboot_timeout: 0s  #WiFi离线多久后重启设备,秒s/分钟min/小时h,不需要此功能设置为0s
  ota_password: '1111111111'    #OTA密码
  api_password: '11111111111'    #API密码
  api_reboot_timeout: 0s  #与客户端(如Home Assistant)失去连接多久后重启设备,秒s/分钟min/小时h,不需要此功能设置为0s


esphome:
  name: $device_name
  platform: ESP8266
  board: esp12e

wifi:
#  networks:
#  - ssid: "wifi"
#    password: "11111111111"
#    channel: (可选,int)网络的通道(1-14)。如果给出,则仅连接到此通道上的
#    bssid: (可选,字符串)定义要连接的网络的BSSID(MAC地址)。这可以用来进一步限制要连接的网络。
#    hidden: (可选,布尔值)此网络是否隐藏。默认为false。如果添加此选项,则还必须指定ssid。
#    priority: 0 (可选,浮动)优先级。每次之后,将选择优先级最高的网络。如果连接失败,则优先级降低一。默认为0。
#  - ssid: "22222222"
#    password: "11111111111"
  ssid: $wifi_ssid
  password: $wifi_password
#可选,手工指定IP地址
  manual_ip:
    static_ip: $wifi_static_ip
    gateway: $wifi_gateway
    subnet: $wifi_subnet
    dns1: $wifi_dns1           #(可选)
    dns2: $wifi_dns2           #(可选)
  use_address: $wifi_static_ip #(可选,字符串)手动覆盖用于连接ESP的地址。默认为自动生成的值。例如,如果您更改了静态IP并想将OTA刷新为先前配置的IP地址。

  domain: .local   #(可选,字符串):设置用于上传的节点主机名的域。例如,如果将其设置为.local,则所有上传将发送到<HOSTNAME>.local。默认为.local。
  reboot_timeout: $wifi_reboot_timeout   #(可选)wifi连接失败后重启时间,0s禁用。默认为15min。
  power_save_mode: "NONE" #(可选,字符串) WiFi省电模式。NONE(省电最少,ESP8266默认) LIGHT(ESP32默认) HIGH(最省电)
  fast_connect: $wifi_fast_connect       #(可选,on,off)直连WIFI,而不进行信号强弱扫描
#id: #(可选)手动指定用于代码生成的ID。

#无线没有连接的时候用以下信息转为AP模式
  ap:
    ssid: $wifi_ssid_AP
    password: $wifi_password_AP
    channel: 1        #(可选)AP应该在1到14上运行的信道。默认为1。
    manual_ip:        #(可选)手动设置AP的IP选项。与工作站模式的manual_ip相同
        static_ip: 192.168.4.1
        gateway: 192.168.4.1
        subnet: 255.255.255.0
    ap_timeout: 1min #(可选)启用配置的后备热点的时间。默认为1min。

captive_portal:

# Enable logging
logger:

#web_server:

# Enable Home Assistant API
api:
  password: $api_password
  reboot_timeout: $api_reboot_timeout

ota:
  password: $ota_password

sensor:                               #传感器
  - platform: wifi_signal             #这个可以让你的hass显示联网信号强度
    name: "WiFi Signal Sensor"        #名字自取,随意
    update_interval: 60s              #更新时间,这里为60秒

text_sensor:                          #这个可以让你的hass显示联网的信息
  - platform: wifi_info
    ip_address:
      name: ESP IP Address            #nodemcu的ip地址
    ssid:
      name: ESP Connected SSID        #wifi设备的ssid
    bssid:
      name: ESP Connected BSSID       #wifi设备的mac地址

switch:
 - platform: gpio
   name: "通道_1_厨房"
   pin: 15
   restore_mode: ALWAYS_OFF           #RESTORE_DEFAULT_OFF
   id: CH_1

 - platform: gpio
   name: "通道_2_餐厅"
   pin: 14
   restore_mode: ALWAYS_OFF
   id: CH_2

 - platform: gpio
   name: "通道_3_吧台"
   pin: 12
   restore_mode: ALWAYS_OFF
   id: CH_3

 - platform: gpio
   name: "通道_4"
   pin: 13
   restore_mode: ALWAYS_OFF
   id: CH_4

binary_sensor:
#全开
 - platform: remote_receiver
   name: "大门_全开"
   internal: true
   filters:
     - delayed_off: 100ms
   rc_switch_raw:
     code: '010111000100100000000100'
     protocol: 1
   on_press:
     then:
       - switch.turn_on: CH_1
       - switch.turn_on: CH_2
       - switch.turn_on: CH_3
#       - switch.turn_on: CH_4
#局部全开
 - platform: remote_receiver
   name: "大门_局部开"
   internal: true
   filters:
     - delayed_off: 100ms
   rc_switch_raw:
     code: '010100010100100000000010'
     protocol: 1
   on_press:
     then:
       - switch.turn_on: CH_1
       - switch.turn_on: CH_2
       - switch.turn_on: CH_3
#        - switch.turn_on: CH_4


#全关
 - platform: remote_receiver
   name: "大门_全关"
   internal: true
   filters:
     - delayed_off: 100ms
   rc_switch_raw:
     code: '010111000100100000000010'
     protocol: 1
   on_press:
     then:
       - switch.turn_off: CH_1
       - switch.turn_off: CH_2
       - switch.turn_off: CH_3
#        - switch.turn_off: CH_4

#局部全关
 - platform: remote_receiver
   name: "大门_局部关"
   internal: true
   filters:
     - delayed_off: 100ms
   rc_switch_raw:
     code: '010111000100100000001000'
     protocol: 1
   on_press:
     then:
       - switch.turn_off: CH_1
       - switch.turn_off: CH_2
       - switch.turn_off: CH_3
#        - switch.turn_off: CH_4

 - platform: remote_receiver
   name: "过道边_局部关"
   internal: true
   filters:
     - delayed_off: 100ms
   rc_switch_raw:
     code: '010110010100100000001000'
     protocol: 1
   on_press:
     then:
       - switch.turn_off: CH_1
       - switch.turn_off: CH_2
       - switch.turn_off: CH_3
#        - switch.turn_off: CH_4

#局部全关 外面全关
 - platform: remote_receiver
   name: "书房_墙壁_外面全部关"
   internal: true
   filters:
     - delayed_off: 100ms
   rc_switch_raw:
     code: '100001000100011100000010'
     protocol: 1
   on_press:
     then:
       - switch.turn_off: CH_1
       - switch.turn_off: CH_2
       - switch.turn_off: CH_3
#        - switch.turn_off: CH_4

 - platform: remote_receiver
   name: "书房_空闲_外面全部关"
   internal: true
   filters:
     - delayed_off: 100ms
   rc_switch_raw:
     code: '100001100100011100000010'
     protocol: 1
   on_press:
     then:
       - switch.turn_off: CH_1
       - switch.turn_off: CH_2
       - switch.turn_off: CH_3
#        - switch.turn_off: CH_4


 - platform: remote_receiver
   name: "卧室_靠门_外面全部关"
   internal: true
   filters:
     - delayed_off: 100ms
   rc_switch_raw:
     code: '001110000100011000000010'
     protocol: 1
   on_press:
     then:
       - switch.turn_off: CH_1
       - switch.turn_off: CH_2
       - switch.turn_off: CH_3
#        - switch.turn_off: CH_4

 - platform: remote_receiver
   name: "卧室_靠窗_外面全部关"
   internal: true
   filters:
     - delayed_off: 100ms
   rc_switch_raw:
     code: '100010110100011100001000'
     protocol: 1
   on_press:
     then:
       - switch.turn_off: CH_1
       - switch.turn_off: CH_2
       - switch.turn_off: CH_3
#        - switch.turn_off: CH_4


# 1通道 厨房
 - platform: remote_receiver
   name: "大门_厨房"
   internal: true
   filters:
     - delayed_off: 100ms
   rc_switch_raw:
     code: '010100010100100000001000'
     protocol: 1
   on_press:
     then:
       - switch.toggle: CH_1

 - platform: remote_receiver
   name: "厨房_厨房"
   internal: true
   filters:
     - delayed_off: 100ms
   rc_switch_raw:
     code: '100010000100011100000100'
     protocol: 1
   on_press:
     then:
       - switch.toggle: CH_1

 - platform: remote_receiver
   name: "厨房_开"
   internal: true
   filters:
     - delayed_off: 100ms
   rc_switch_raw:
     code: '010011110001001100001100'
     protocol: 1
   on_press:
     then:
       - switch.turn_on: CH_1

 - platform: remote_receiver
   name: "厨房_关"
   internal: true
   filters:
     - delayed_off: 100ms
   rc_switch_raw:
     code: '010011110001001111000000'
     protocol: 1
   on_press:
     then:
       - switch.turn_off: CH_1


#2通道    餐厅
 - platform: remote_receiver
   name: "大门_餐厅"
   internal: true
   filters:
     - delayed_off: 100ms
   rc_switch_raw:
     code: '100010100100011100000010'
     protocol: 1
   on_press:
     then:
       - switch.toggle: CH_2

 - platform: remote_receiver
   name: "餐厅_餐厅"
   internal: true
   filters:
     - delayed_off: 100ms
   rc_switch_raw:
     code: '100010010100011100000100'
     protocol: 1
   on_press:
     then:
       - switch.toggle: CH_2

 - platform: remote_receiver
   name: "餐厅_开"
   internal: true
   filters:
     - delayed_off: 100ms
   rc_switch_raw:
     code: '000111011101001100001100'
     protocol: 1
   on_press:
     then:
       - switch.turn_on: CH_2

 - platform: remote_receiver
   name: "餐厅_关"
   internal: true
   filters:
     - delayed_off: 100ms
   rc_switch_raw:
     code: '000111011101001111000000'
     protocol: 1
   on_press:
     then:
       - switch.turn_off: CH_2


#3通道    吧台
 - platform: remote_receiver
   name: "吧台_开"
   internal: true
   filters:
     - delayed_off: 100ms
   rc_switch_raw:
     code: '110011011111001100001100'
     protocol: 1
   on_press:
     then:
       - switch.turn_on: CH_3

 - platform: remote_receiver
   name: "吧台_关"
   internal: true
   filters:
     - delayed_off: 100ms
   rc_switch_raw:
     code: '110011011111001111000000'
     protocol: 1
   on_press:
     then:
       - switch.turn_off: CH_3

 - platform: remote_receiver
   name: "大门_吧台"
   internal: true
   filters:
     - delayed_off: 100ms
   rc_switch_raw:
     code: '100010100100011100000100'
     protocol: 1
   on_press:
     then:
       - switch.toggle: CH_3

 - platform: remote_receiver
   name: "吧台_吧台"
   internal: true
   filters:
     - delayed_off: 100ms
   rc_switch_raw:
     code: '010011110100100000000100'
     protocol: 1
   on_press:
     then:
       - switch.toggle: CH_3

 - platform: remote_receiver
   name: "电脑边_吧台"
   internal: true
   filters:
     - delayed_off: 100ms
   rc_switch_raw:
     code: '001101100100011000001000'
     protocol: 1
   on_press:
     then:
       - switch.toggle: CH_3

 - platform: remote_receiver
   name: "过道边_吧台"
   internal: true
   filters:
     - delayed_off: 100ms
   rc_switch_raw:
     code: '010110010100100000000100'
     protocol: 1
   on_press:
     then:
       - switch.toggle: CH_3


remote_receiver:                #rf射频的接收,详见https://esphome.io/components/remote_receiver.html
  pin: 5
  dump:                         #解码的类型
    - rc_switch                 #使用RCSwitch RF来解码
  tolerance: 50%                #远程信号长度在解码过程中可以偏离的百分比。默认为25%,我这设置50%
  filter: 200us                 #过滤所有比此短的脉冲。用于消除噪声信号中的毛刺。默认为10us,我这设置为200us
  idle: 4ms                     #信号应保持稳定(即不发生变化)以使其被视为完整的时间。默认为10ms,我这设置为4ms
  buffer_size: 1kb              #用于存储远程代码的内部缓冲区的大小。ESP32默认10kb ,ESP8266 默认1kb(以上步骤完成并刷新固件后,在esphome网页的showlogs页面,当按下rf遥控器,可以看到一串二进制的code,以上参数需要自行调整,详见https://esphome.io/components/remote_receiver.html以及https://esphome.io/components/remote_transmitter.html)
配套windows程序大概如下(完善后会提供下载)

|