|
|
本帖最后由 sirrom 于 2018-4-11 16:53 编辑
先说下背景。
三四年前自己写了个JAVA后台,利用structs2+mina+esp8266+arduino远程控制家里的空调和车库门(433模块)。当时esp8266刷的nodemcu,用的lua语言。因为当时nodemcu不支持IRremote,所以没办法甩掉arduino。方法是把RawData放在java后台(pi3),再传给esp8266,esp8266通过串口传给arduino,arduino有IR库,直接发射就可以了。之后偶然发现了espeasy,espeasy支持IR transmitter,心想这下总算可以不要arduino了。Google了一下,发现也是不直接支持发送RawData,而且也不支持未知的协议,无奈只得放弃。再次搜索发现Arduino IDE早就支持esp8266的板子了,并且有相关的IRremote库和mqtt库,哈哈,终于看到可行方案了。
别问我为什么执着的要在esp8266上折腾,因为一百多大洋的什么博联红豆空调伴侣等,根本不是我的菜,一是太贵,二是浪费,三是喜欢DIY。我四个房间,五台空调,成本低是最重要的。贫穷限制了我的购买力... 土豪随意。 土豪随意。
好了,前面啰嗦了一大堆,开始上菜了。
配件清单:
1. arduino nano 一块
2. 红外接收头HS0038一个
3. 红外发射头一个
4. 47R、10K电阻各一个
5. 三极管2n2222一个
6. esp8266-12F或者nodemcu或者mini D1任选其一。
硬件超级简单吧?不算接收模块,单算发射模块的话,成本十几块钱,是不是超级便宜。
--------接收模块--------
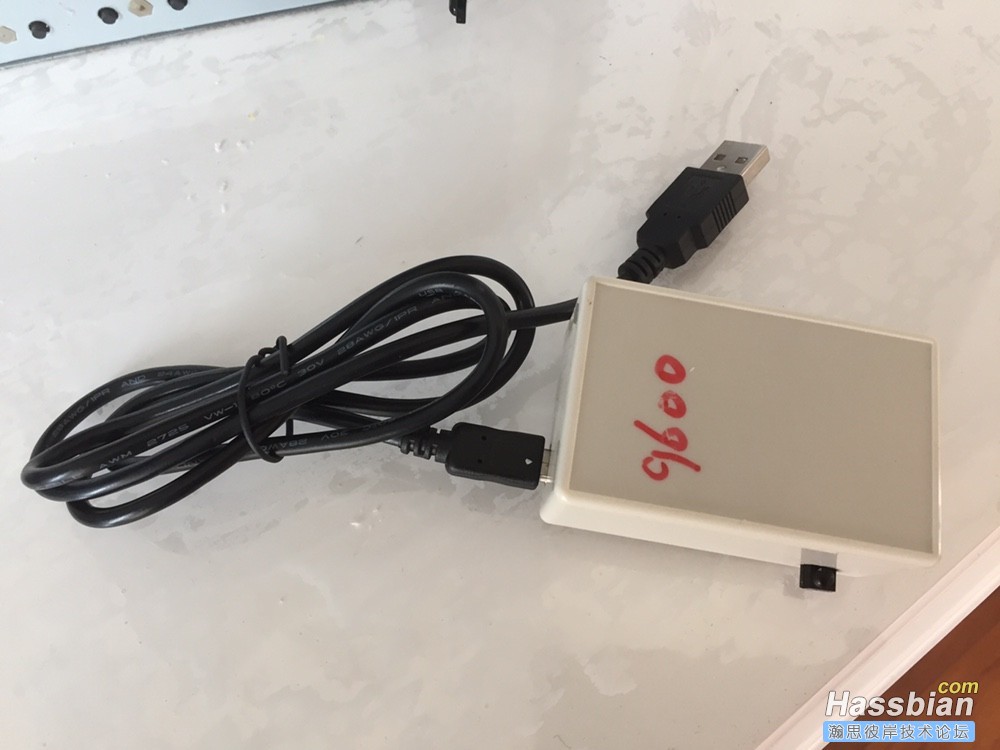
在arduino nano上刷入IRrecvDumpV2,按IRrecvDumpV2中的数据引脚接好红外接收头。
相信这块大部分同学都应该会。我搞了个小盒子封装了一下,方便随时使用。

--------发射模块--------
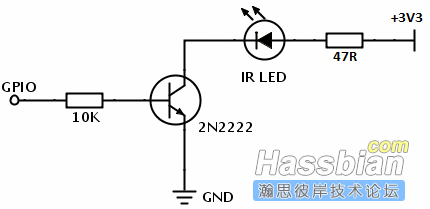
按如下电路图接线:

GPIO口将在下面程序中定义,测试时我用的nodemcu,GPIO口为4(D2)。
重点在于程序..............
下载arduino-1.8.4,安装esp8266板子的支持:
启动arduino,打开菜单 文件--->首选项
在附加开发板管理器URL字段填入: http://arduino.esp8266.com/stable/package_esp8266com_index.json
点菜单 工具--->开发板, 打开开发板管理器,选择安装 esp8266平台。
安装IRremote库和mqtt库:
项目--->加载库--->管理库,分别搜索IRremoteESP8266和PubSubClient并安装。
请分别测试好的IRremoteESP8266模块和mqtt模块,不然debug会非常头痛。
esp8266程序如下:
#ifndef UNIT_TEST
#include <Arduino.h>
#endif
#include <IRremoteESP8266.h>
#include <IRsend.h>
#define IR_LED 4 // ESP8266 GPIO pin to use. Recommended: 4 (D2).
IRsend irsend(IR_LED); // Set the GPIO to be used to sending themessage.
// Example of data captured by IRrecvDumpV2.ino
uint16_t rawData[211] = {…};
void setup() {
irsend.begin();
Serial.begin(115200, SERIAL_8N1, SERIAL_TX_ONLY);
}
void loop() {
delay(3000);
// Serial.println("a rawData capture from IRrecvDumpV2");
irsend.sendRaw(rawData, 211, 38); // Send a raw datacapture at 38kHz.
Serial.println("RawData sent.");
}
我的是奥克斯空调,大家在rawData中填自己相应的空调代码,接好线刷入上面的程序,对准空调测试。
mqtt程序如下:
#include <ESP8266WiFi.h>
#include <ubSubClient.h>
const char* ssid = "........";
const char* password = "........";
const char* mqtt_server = "192.168.2.110";
WiFiClient espClient;
PubSubClient client(espClient);
long lastMsg = 0;
char msg[50];
int value = 0;
void setup() {
pinMode(BUILTIN_LED, OUTPUT);
Serial.begin(115200);
setup_wifi();
client.setServer(mqtt_server, 1883);
client.setCallback(callback);
}
void setup_wifi() {
delay(10);
Serial.println();
Serial.print("Connecting to ");
Serial.println(ssid);
WiFi.begin(ssid, password);
while (WiFi.status() != WL_CONNECTED) {
delay(500);
Serial.print(".");
}
Serial.println("");
Serial.println("WiFi connected");
Serial.println("IP address: ");
Serial.println(WiFi.localIP());
}
void callback(char* topic, byte* payload, unsigned int length) {
Serial.print("Message arrived [");
Serial.print(topic);
Serial.print("] ");
for (int i = 0; i < length; i++) {
Serial.print((char)payload);
}
Serial.println();
// Switch on the LED if an 1 was received as first character
if ((char)payload[0] == '1') {
digitalWrite(BUILTIN_LED, LOW); // Turn the LED on(Note that LOW is the voltage level
} else {
digitalWrite(BUILTIN_LED, HIGH); // Turn the LED offby making the voltage HIGH
}
}
void reconnect() {
// Loop until we're reconnected
while (!client.connected()) {
Serial.print("Attempting MQTT connection...");
// Attempt to connect
if (client.connect("ESP8266Client")) {
Serial.println("connected");
// Once connected, publish an announcement...
client.publish("outTopic", "helloworld");
// ... and resubscribe
client.subscribe("inTopic");
} else {
Serial.print("failed, rc=");
Serial.print(client.state());
Serial.println(" try again in 5 seconds");
// Wait 5 seconds before retrying
delay(5000);
}
}
}
void loop() {
if (!client.connected()) {
reconnect();
}
client.loop();
long now = millis();
if (now - lastMsg > 2000) {
lastMsg = now;
++value;
snprintf (msg, 75, "hello world #%ld", value);
Serial.print(" ublish message: "); ublish message: ");
Serial.println(msg);
client.publish("outTopic", msg);
}
}
修改一下自己的wifi SSID和密码。
上面两部分都分别测试通过后就可以将其整合到一起来了。原理是esp8266通过mqtt接收RawData,再将rawdata通过红外发射管发射出去。
-----------HA配置部分-------------
configuration.yaml:
input_select:
select_rooms_ac:
name: "选择空调:"
options:
# - Select Rooms
- 客厅
- 餐厅
- 主卧
- 儿童房1
- 儿童房2
initial: 客厅
icon: mdi:air-conditioner
select_mode_ac:
name: "选择模式:"
options:
- SelectMode
- 关闭空调
- 制冷模式
- 制热模式
- 除湿模式
- 自动模式
initial: SelectMode
icon: mdi:settings
select_temp_ac:
name: "空调温度"
options:
- 18°C
- 19°C
- 20°C
- 21°C
- 22°C
- 23°C
- 24°C
- 25°C
- 26°C
- 27°C
- 28°C
- 29°C
- 30°C
- 31°C
- 32°C
initial: 26°C
icon: mdi:thermometer-lines
select_wind_ac:
name: "空调风量"
options:
- 自动
- 静音
- 2级
- 4级
- 6级
initial: 自动
icon: mdi:weather-windy
sensor:
- platform: mqtt
name: livingroomtemperature
state_topic: "/esp05/livingroom/Temperature"
unit_of_measurement: "°C"
- platform: mqtt
name: livingroomhumidity
state_topic: "/esp05/livingroom/Humidity"
unit_of_measurement: "%"
- platform: template
sensors:
ac_temp_show:
value_template: '{{states.input_select.select_temp_ac.state}}'
entity_id:
- input_select.select_temp_ac
ac_wind_show:
value_template: '{{states.input_select.select_wind_ac.state}}'
entity_id:
- input_select.select_wind_ac
customize.yaml:
sensor.ac_temp_show:
friendly_name: 设定的温度
icon: mdi:temperature-celsius
sensor.ac_wind_show:
friendly_name: 设定的风量
icon: mdi:fan
groups.yaml:
airconditioner_control:
name: 空调
view: yes
entities:
- group.airconditioner_entity
airconditioner_entity:
name: 空调控制面板
view: no
control: hidden
entities:
- input_select.select_rooms_ac
- input_select.select_mode_ac
- input_select.select_temp_ac
- input_select.select_wind_ac
- sensor.ac_temp_show
- sensor.ac_wind_show
automations.yaml:
- alias: Livingroom AC Set Mode #客厅空调
initial_state: true
trigger:
- platform: state
entity_id: input_select.select_mode_ac
action:
- service: mqtt.publish
data_template:
topic:"/esp/LivingRoomAC/cmd"
payload_template: >-
{% ifis_state('input_select.select_rooms_ac', '客厅') and trigger.to_state.state == '关闭空调' %}
... #RAWData here
{% elifis_state('input_select.select_rooms_ac', '客厅') and trigger.to_state.state == '制冷模式' and is_state('input_select.select_temp_ac','26°C') %}
...
{% endif %}
- alias: Livingroom AC Set Temperature #客厅空调温度
initial_state: true
trigger:
- platform: state
entity_id: input_select.select_temp_ac
action:
- service: mqtt.publish
data_template:
topic:"/esp/LivingRoomAC/cmd"
payload_template: >-
{% ifis_state('input_select.select_rooms_ac', '客厅') and is_state('input_select.select_mode_ac', '制冷模式') and trigger.to_state.state == '26°C' %}
...
{% elifis_state('input_select.select_rooms_ac', '客厅') and is_state('input_select.select_mode_ac', '制冷模式') and trigger.to_state.state == '25°C' %}
...
{% elifis_state('input_select.select_rooms_ac', '客厅') and is_state('input_select.select_mode_ac', '制冷模式') and trigger.to_state.state == '24°C' %}
...
{% elifis_state('input_select.select_rooms_ac', '客厅') and is_state('input_select.select_mode_ac', '制冷模式') and trigger.to_state.state == '23°C' %}
...
{% elifis_state('input_select.select_rooms_ac', '客厅') and is_state('input_select.select_mode_ac', '制冷模式') and trigger.to_state.state == '22°C' %}
...
{% elifis_state('input_select.select_rooms_ac', '客厅') and is_state('input_select.select_mode_ac', '制冷模式') and trigger.to_state.state == '21°C' %}
...
{% elifis_state('input_select.select_rooms_ac', '客厅') and is_state('input_select.select_mode_ac', '制冷模式') and trigger.to_state.state == '20°C' %}
...
{% elifis_state('input_select.select_rooms_ac', '客厅') and is_state('input_select.select_mode_ac', '制冷模式') and trigger.to_state.state == '19°C' %}
...
{% elifis_state('input_select.select_rooms_ac', '客厅') and is_state('input_select.select_mode_ac', '制冷模式') and trigger.to_state.state == '18°C' %}
...
{% endif %}
---------------------------
automations.yaml没有post完整,重复内容太多。按照上面的逻辑写就是了。
粘贴的时候一不小心把所有内容粘贴上来了,因为rawdata太大,浏览器一下子就卡死了。吓死人了,还好论坛自带保存功能,不然这篇帖子就发不出来了。内容太多,我可不想再重新打一遍字。
------------
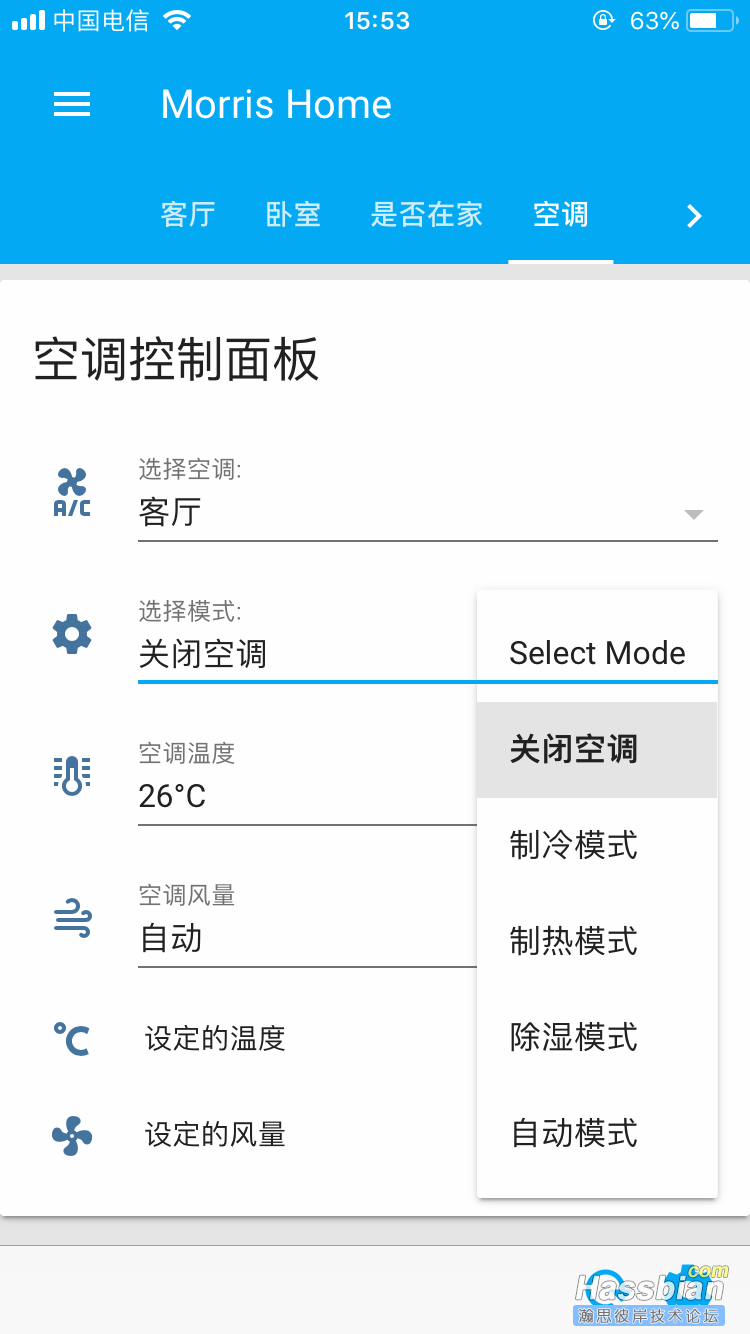
主要讲思路,效果图如下:

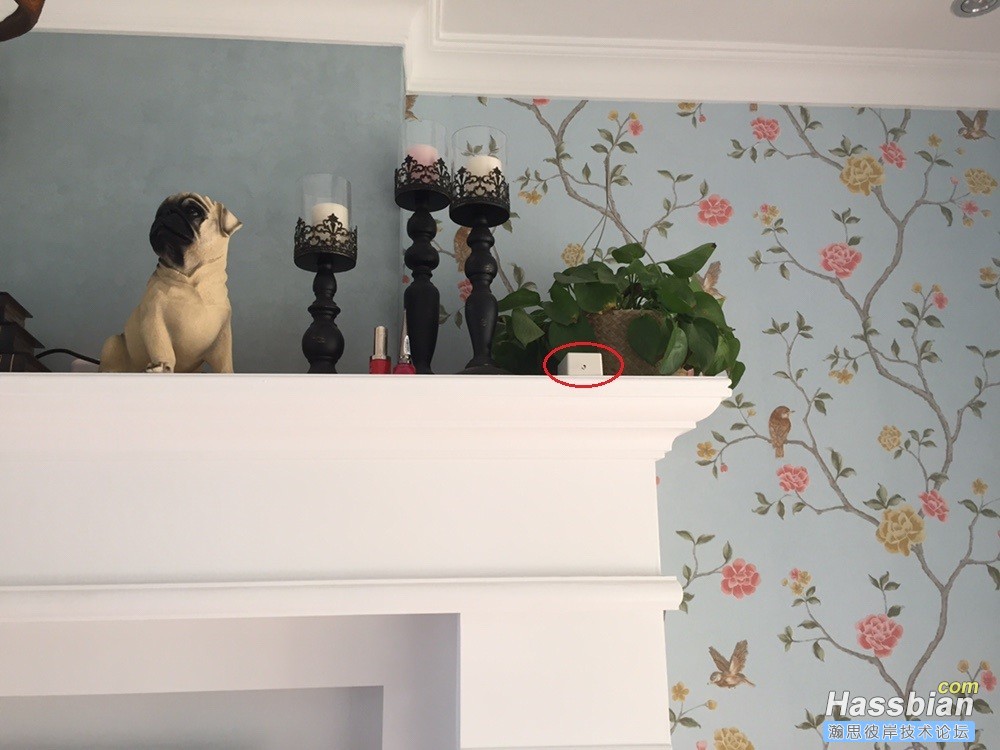
同样,发射模块我也做成了一个盒子,并放在电视机背景墙上,丝毫不起眼。

-----目前有3个问题------
1. 因为esp8266的GPIO口驱动电流太小,严重限制了红外发射距离,虽然加了2N2222进行功率放大,距离是增加了,但是在室外光线太强烈的情况下,干扰还是蛮大的,时不时会失灵。有好办法的请告诉我。
2.其实这个不算问题,在HA的界面上,我希望有一个类似Input_Button的按钮,这样不用通过选择功能(Input_select)来触发,而通过页面点击“发送”按钮来发送,省得误操作。
3.空调不带反馈功能是最无奈的,我有一个想法,就是在空调上粘贴一个同步接收端,接收到相应数据再反馈给HA。模块小巧可以做到,如何供电一直是我头痛的一件事。有好的供电方案(3.3v)的请告诉我。
---最后,编辑帖子真是太痛苦了。---
|
评分
-
查看全部评分
|