本帖最后由 hungheo 于 2025-11-13 16:17 编辑
button card 使用
所有template都在附件中,button card 默认的tap_action是toggle,如果不是可以开关的类型,记得修改一下,不然会报错(有些地方可能我没修改)。
可以参考我的另外的帖子:https://bbs.hassbian.com/thread-26299-1-1.html
1、房间卡片
variables最好都写完,如果没有的填写null,示例如下:
type: custom:button-card
entity: sensor.devices_count_light_all #主ID
template: rooms_template
variables:
  room_name: 客厅
  room_path: "#keting_control" #控制类弹出窗口路径
  background_image: url('/local/home_picture/keting.jpg') #卡片背景图片
  temperature: sensor.a4c138d5271a_temperature #温度
  humidity: sensor.a4c138d5271a_humidity #湿度
  light_entity: sensor.devices_count_light_keting #房间开灯统计
  light_path: "#keting_light" #灯弹出窗口路径
  move_entity: binary_sensor.esp32_keting_presence #人体传感
  move_path: "#keting_move" #人体传感弹出窗口路径
  havc_entity: climate.qdhkl_cn_proxy_532016519_0103_ac #空调
2、户型图预览
需要设置总宽高,里面的每个房间大小和动画可以根据总宽高等比例放大缩小
type: custom:button-card
template: floorplan #模板名称
variables:
  entities:
    zhuwo: #房间名称
      - entity: binary_sensor.esp32_2450_presence #触发实体名称,没有的可以不写
        path: "#zhuwo_move" #点击跳转路径,没有的可以不写
    keting:
      - entity: binary_sensor.esp32_keting_presence
        path: "#keting_move"
    zhuwei:
      - entity: binary_sensor.d4f0ead95521_occupancy
        path: "#zhuwei_move"
    kewei:
      - entity: binary_sensor.a4c138419493_occupancy
        path: "#kewei_move"
    chufang:
      - entity: binary_sensor.ccb5d1f2b505_occupancy
        path: "#chufang_move"
  width: 300 #宽度 ,每个房间的尺寸和动画范围根据这个动态调整
  height: 300 # 高度,每个房间的尺寸和动画范围根据这个动态调整
  accent_color: var(--amber-color)  #触发高亮颜色,默认是var(--accent-color),可以不写
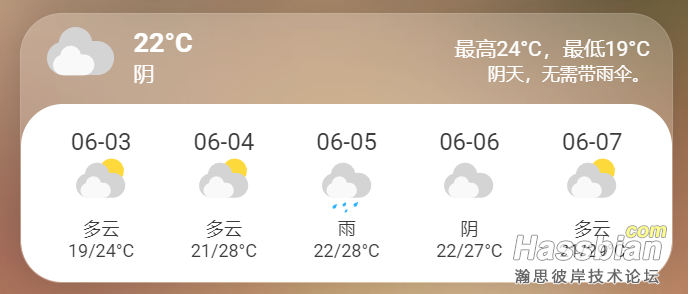
3、天气卡片
需要自己准备图标(需要修改图标路径)
天气的集成用的是https://github.com/hasscc/tianqi,跟和风天气一样的用

4、温湿度
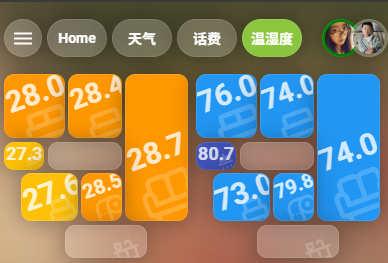
背景根据不同的数值会有不同的颜色
可以根据温湿度entity的后缀识别是温度还是湿度数据,无需修改template

引用:
type: custom:button-card
template: floorplan_en
variables:
  entities:
    zhuwo:
      - entity: sensor.a4c13823df0b_temperature
    keting:
      - entity: sensor.a4c138d5271a_temperature
    daciwo:
      - entity: sensor.a4c1387d255a_temperature
    xiaociwo:
      - entity: sensor.a4c138dfe30d_temperature
    zhuwei:
      - entity: sensor.0x00158d000444b5af_temperature
    kewei:
      - entity: sensor.0x00158d000444b6a2_temperature
  width: 184
  height: 184
button_card_template代码:
5、隐藏顶部菜单栏及调出侧边栏
手机APP默认是收起侧边栏的,隐藏顶部菜单栏后需要设置一个按钮才能调出侧边栏
之前用的是Kiosk Mode插件,button card写个菜单按钮,通过辅助元素的开关,控制顶部菜单栏的显示与隐藏。
具体代码:
kiosk_mode:
  entity_settings:
    - entity:
        input_boolean.ceshi5: "on"
      hide_header: true
    - entity:
        input_boolean.ceshi5: "off"
      hide_header: false
但最近手贱更新了Kiosk mode,经常提示错误,再加上我是用的yaml模式编辑的,感觉显示顶部菜单栏也没啥意义,干脆直接隐藏了。
隐藏方法(二选一):
(1)、card_mod插件,在主题文件中添加:
card-mod-theme: "hungheo" #跟主题名称相同
card-mod-root: |
  .header {
    display: none;
  }
(2)、Kiosk mode插件,前端文件添加
kiosk_mode:
  hide_header: true
mushroom chips带了一个菜单栏按钮,但是如果mushroom chips内嵌到button card会出现不兼容,并报错。
所以直接用button card写一个
2025-10-14 更新: button card 版本更新到5.0.2后,使用了新的方法
type: custom:button-card
icon: mdi:menu
show_name: false
tap_action:
  # toggle_menu: | 弃用
  action: javascript #新增
  javascript: | #新增
    [[[
      this.dispatchEvent(new Event('hass-toggle-menu', { bubbles: true,composed: true }));
    ]]]
styles:
  card:
    - height: 38px
    - backdrop-filter: none
  icon:
    - width: 24px
    - justify-self: center
    - color: var(--state-inactive-color)
6、其他
triggers_update使用,7.0.0版本及以后弃用:
在button card中,JS模板是静态模板,如果主entity 不更新的话,里面的其他enttiy.state是不会更新的,因此要用到triggers_update单独更新
type: custom:button-card
entity: sensor.mysensor #主enttiy ID
triggers_update:
  - switch.myswitch  #这里需要填上entity ID 单独更新
show_label: true
label: "[[[return  states['switch.myswitch'].state]]]" #其他enttiy ID
2025-11-13更新:
7.0.0版本及以后使用规则:
(1)、引用实体列表中的entity id时,所有的variables变量都能根据自身状态改变而自行调整,原有设置的triggers_update会失效
(2)、非实体列表中的变量时,需要手动设置更新(求值)
例子:
type: custom:button-card
entity: switch.skylight
update_timer: 1s #强制更新时间间隔
variables:
  always_evaled: #允许更新的变量列表
    value: '[[[ window.alwaysEvaled = `${new Date().getTime()}`; ]]]'  #这里的new Date().getTime()变量不是ha里的实体
    force_eval: true #强制更新
  never_evaled: '[[[ window.neverEvaled = `${new Date().getTime()}`; ]]]' #不允许更新的变量列表,只会在第一次加载时求值
name: 'always should update every second,<br/>never should be unset'
show_label: true
label: |
  [[[
    return `always: ${window.alwaysEvaled || "not set"}
      <br/>never: ${window.neverEvaled || "not set"}`;
   ]]]
|