|
|
本帖最后由 David_dongye 于 2023-7-7 11:31 编辑
电信之前送过一个涂鸦红外遥控器,想接入HA,但是涂鸦自己的localtuya啥的试了,不行。又在github上发现了TUYA-CONVERT,可以把涂鸦设备(esp8266的)刷入tasmota,但是需要“一个有无线网卡的 Linux 设备”,感觉有点麻烦就没弄。
后面拆开直接刷了esphome,引脚定义参考官方文档https://developer.tuya.com/cn/do ... 8425498767728997246烧录用usb转ttl,接板子对应位置(板子上都标注好了的 ),刷的时候D0要接地
这个东西便宜的很,咸鱼上20多,如果只用红外的话,我感觉比博联的体验好(我路由器AC86U, 博联偶尔连不上)
我的涂鸦红外遥控器型号是UFO-R1,圆形黑色
esphome:
  name: tuya-ir

esp8266:
  board: esp01_1m

# Enable logging
logger:

# Enable Home Assistant API
api:
  password: "11"
ota:
  password: "11"

wifi:
  ssid: !secret wifi_ssid
  password: !secret wifi_password

  # Enable fallback hotspot (captive portal) in case wifi connection fails
  ap:
    ssid: "tuya-ir"
    password: "111111111"
  manual_ip:
    static_ip: 192.168.50.**    #自己定义的地址
    gateway: 192.168.50.1       #网关
    subnet: 255.255.255.0

captive_portal:

mqtt:
  broker: 192.168.50.**
  username: *****
  password: *****
  discovery: true

remote_receiver:
  pin:
    number: GPIO5
    inverted: True
    mode: INPUT_PULLUP
  dump: all
  on_nec:
    then:
    - script.execute: show_light
    - mqtt.publish:
        topic: tuya/recv/ir
        payload: !lambda |-
          char temp[20];
          sprintf(temp, "nec:%d:%d", x.address, x.command);
          ESP_LOGI("main", "nec: %s", temp);
          id(ir_recv_code).publish_state(temp);
          return temp;
  on_panasonic:
    then:
    - script.execute: show_light
    - mqtt.publish:
        topic: tuya/recv/ir
        payload: !lambda |-
          char temp[20];
          sprintf(temp, "panasonic:%d:%d", x.address, x.command);
          ESP_LOGI("main", "nec: %s", temp);
          id(ir_recv_code).publish_state(temp);
          return temp;
  on_sony:
    then:
    - script.execute: show_light
    - mqtt.publish:
        topic: tuya/recv/ir
        payload: !lambda |-
          char temp[20];
          sprintf(temp, "sony:%d:%d", x.data, x.nbits);
          ESP_LOGI("main", "nec: %s", temp);
          id(ir_recv_code).publish_state(temp);
          return temp;
  on_samsung:
    then:
    - script.execute: show_light
    - mqtt.publish:
        topic: tuya/recv/ir
        payload: !lambda |-
          char temp[20];
          sprintf(temp, "samsung:%d:%d", x.data, x.nbits);
          ESP_LOGI("main", "nec: %s", temp);
          id(ir_recv_code).publish_state(temp);
          return temp;
  on_rc6:
    then:
    - script.execute: show_light
    - mqtt.publish:
        topic: tuya/recv/ir
        payload: !lambda |-
          char temp[20];
          sprintf(temp, "rc6:%d:%d", x.address, x.command);
          ESP_LOGI("main", "nec: %s", temp);
          id(ir_recv_code).publish_state(temp);
          return temp;
  on_rc5:
    then:
    - script.execute: show_light
    - mqtt.publish:
        topic: tuya/recv/ir
        payload: !lambda |-
          char temp[20];
          sprintf(temp, "rc5:%d:%d", x.address, x.command);
          ESP_LOGI("main", "nec: %s", temp);
          id(ir_recv_code).publish_state(temp);
          return temp;

remote_transmitter:
  pin: GPIO14
  carrier_duty_percent: 50%

text_sensor:
  - platform: template
    id: ir_recv_code
    name: "IR recv code"
    update_interval: 3600s
  - platform: mqtt_subscribe
    name: "IR send code"
    topic: tuya/send/ir_nec
    on_value:
      then:
        remote_transmitter.transmit_nec:
          address: !lambda |-
            unsigned int addr;
            unsigned int command;
            sscanf(x.c_str(),"%d:%d",&addr,&command);
            return addr;
          command: !lambda |-
            unsigned int addr;
            unsigned int command;
            sscanf(x.c_str(),"%d:%d",&addr,&command);
            return command;
switch:
  - platform: gpio
    id: signal_light
    pin: GPIO4  #D4
    name: "signal_light"

script:
  - id: show_light
    then:
      - switch.turn_on:
          id: signal_light
      - delay: 0.1s
      - switch.turn_off:
          id: signal_light

web_server:
  port: 80
发送只加了一个nec编码格式的,如果红外是其他编码格式请自行添加哦
使用:
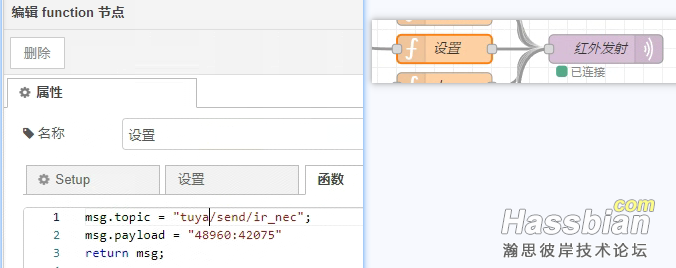
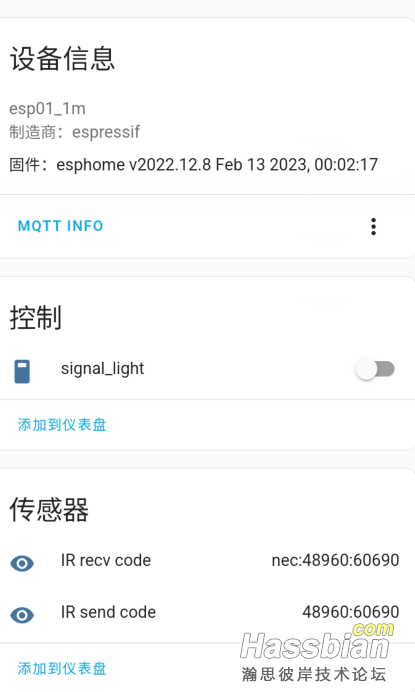
先用遥控器按下按钮,此时HA中的ir_recv_code会显示收到的码,将这个码记下来,用nodered的mqttout节点发给涂鸦遥控


关于空调无法控制的问题,我参考了网上这篇博客https://weiyangbo.gitee.io/2022/03/06/ESPHome-IRomte/#%E7%BA%A2%E5%A4%96%E6%8E%A5%E6%94%B6%E4%B8%8E%E9%81%A5%E6%8E%A7%E5%99%A8%E5%AD%A6%E4%B9%A0
我的理解是空调的raw码(原始未处理的红外信号格式)比较长,在转换成NEC格式的时候有信息丢失了,我是用笨办法解决的:
首先代码中要改为返回raw码,在日志就会打印出接收到的原始红外码
OTA升级了后,按下空调遥控器按键,在日志中就能看到原始红外码,即Recived Raw字段的内容,然后把这段码写死到代码中的code数组中就可以了

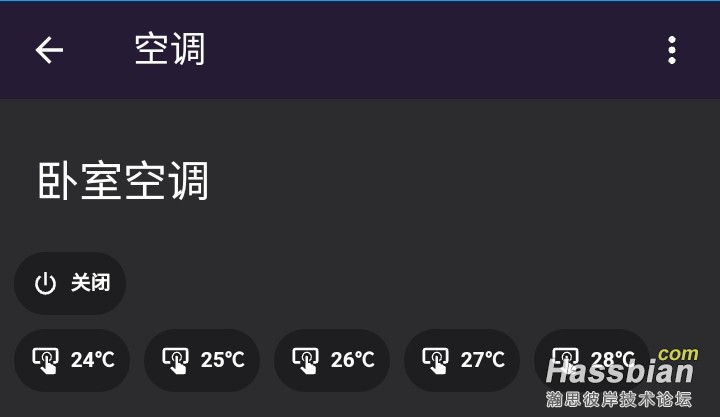
我记录了开机、24~28摄氏度

代码如下,不优雅了,只能将就用用
esphome:
  name: tuya-ir-121

esp8266:
  board: esp01_1m

# Enable logging
logger:

# Enable Home Assistant API
api:
  password: "123"
ota:
  password: "123"

wifi:
  ssid: !secret wifi_ssid
  password: !secret wifi_password

  # Enable fallback hotspot (captive portal) in case wifi connection fails
  ap:
    ssid: "tuya-ir-121"
    password: "123456"
  manual_ip:
    static_ip: 192.168.50.121   #自己定义的地址
    gateway: 192.168.50.1       #网关
    subnet: 255.255.255.0

captive_portal:

remote_receiver:
  pin:
    number: GPIO5
    inverted: True
    mode: INPUT_PULLUP
  dump: raw
  idle: 40ms

remote_transmitter:
  pin: GPIO14
  carrier_duty_percent: 50%

button:
  - platform: template
    name: "Close"
    on_press:
      - script.execute: show_light
      - remote_transmitter.transmit_raw:
          carrier_frequency: 38kHz
          code: [8483, -4093,***此处省略,反正很长**** -545, 552]  #这个code改成自己识别到的raw码
  - platform: template
    name: "24℃"
    on_press:
      - script.execute: show_light
      - remote_transmitter.transmit_raw:
          carrier_frequency: 38kHz
          code: [8482, -4095,***此处省略,反正很长**** 547, -550, 547]  #这个code改成自己识别到的raw码
  - platform: template
    name: "25℃"
    on_press:
      - script.execute: show_light
      - remote_transmitter.transmit_raw:
          carrier_frequency: 38kHz
          code: [8487, -4090,***此处省略,反正很长****44, -552, 550]  #这个code改成自己识别到的raw码
  - platform: template
    name: "26℃"
    on_press:
      - script.execute: show_light
      - remote_transmitter.transmit_raw:
          carrier_frequency: 38kHz
          code: [8486, -4090, ***此处省略,反正很长****, -551, 548]  #这个code改成自己识别到的raw码
  - platform: template
    name: "27℃"
    on_press:
      - script.execute: show_light
      - remote_transmitter.transmit_raw:
          carrier_frequency: 38kHz
          code: [8488, -4090, ***此处省略,反正很长**** -551, 548]  #这个code改成自己识别到的raw码
  - platform: template
    name: "28℃"
    on_press:
      - script.execute: show_light
      - remote_transmitter.transmit_raw:
          carrier_frequency: 38kHz
          code: [8487, -4089***此处省略,反正很长****-550, 547]  #这个code改成自己识别到的raw码

switch:
  - platform: gpio
    id: signal_light
    pin: GPIO4  #D4
    name: "signal_light"

script:
  - id: show_light
    then:
      - switch.turn_on:
          id: signal_light
      - delay: 0.1s
      - switch.turn_off:
          id: signal_light

web_server:
  port: 80
|
评分
-
查看全部评分
|