|
|
楼主 |
发表于 2021-10-24 01:17:28
|
显示全部楼层
本帖最后由 sasukebinbin 于 2021-10-24 23:03 编辑
中文TTS教程来了
1. 首先在辅助元素里创建一个文本元素, 名称叫tts_msg, 也可以为其他的,但是要修改并确保实体ID为input_text.tts_msg
这里就是你输入TTS文本的地方
2. 这里开始在Nodered上进行

大家可以复制下面的内容到剪切板,然后选择导入剪切板并粘贴内容, 记得选择新流程选项
[{"id":"1c893a2.860cac6","type":"tab","label":"TTS 例子","disabled":false,"info":""},{"id":"f3e70c14.b85b7","type":"http request","z":"1c893a2.860cac6","name":"Get TTS URL","method":"POST","ret":"obj","paytoqs":true,"url":"https://xxxxx/api/tts_get_url","tls":"","proxy":"","authType":"bearer","x":1030,"y":380,"wires":[["2ce1858.4ed177a"]]},{"id":"4983eb78.0e97e4","type":"debug","z":"1c893a2.860cac6","name":"","active":true,"tosidebar":true,"console":false,"tostatus":false,"complete":"true","targetType":"full","x":1650,"y":380,"wires":[]},{"id":"3adfb74.8ed4648","type":"function","z":"1c893a2.860cac6","name":"Set Header","func":"\n\nmsg.headers = {};\nmsg.headers={\n 'Content-Type': 'application/json'\n};\nmsg.payload = {};\n\n\nreturn msg","outputs":1,"noerr":0,"x":470,"y":380,"wires":[["7f76426b.3178ac"]]},{"id":"7f76426b.3178ac","type":"http request","z":"1c893a2.860cac6","name":"Get TTS Text","method":"GET","ret":"obj","paytoqs":true,"url":"https://xxxxx/api/states/input_text.tts_msg","tls":"","proxy":"","authType":"bearer","x":650,"y":380,"wires":[["85e920ac.9be84"]]},{"id":"ac8fe3a0.fc39b","type":"inject","z":"1c893a2.860cac6","name":"","topic":"","payload":"","payloadType":"date","repeat":"","crontab":"","once":false,"onceDelay":0.1,"x":290,"y":380,"wires":[["3adfb74.8ed4648"]]},{"id":"85e920ac.9be84","type":"function","z":"1c893a2.860cac6","name":"Microsoft TTS","func":"let tts = msg.payload.state\n\nmsg.headers = {};\nmsg.headers={\n 'Content-Type': 'application/json'\n};\n\nmsg.payload = {\n "message": tts,\n "platform": "edge_tts",\n "language": "zh-CN",\n "options": {\n "voice":"zh-CN-XiaomoNeural",\n "style": "cheerful",\n "role": "girl",\n "pitch": "+6Hz",\n "rate": "-20%",\n }\n};\n\n\n\nreturn msg","outputs":1,"noerr":0,"x":840,"y":380,"wires":[["f3e70c14.b85b7"]]},{"id":"2ce1858.4ed177a","type":"function","z":"1c893a2.860cac6","name":"MQTT Post","func":"\nvar obj = {};\nlet path = msg.payload.path;\nobj.url = "http://xxxxxx" + path ;\n\n\n\nmsg.headers = {};\nmsg.headers={\n 'Content-Type': 'application/json'\n};\n\nmsg.payload = {};\nmsg.payload={ \n "payload": obj.url,\n "topic": mrdiynotifier/play\n};\n\n\n\nreturn msg","outputs":1,"noerr":0,"x":1250,"y":380,"wires":[["5b94506.36c38b"]]},{"id":"5b94506.36c38b","type":"http request","z":"1c893a2.860cac6","name":"MQTT Publish","method":"POST","ret":"obj","paytoqs":true,"url":"https://xxxxx/api/services/mqtt/publish","tls":"","proxy":"","authType":"bearer","x":1460,"y":380,"wires":[["4983eb78.0e97e4"]]},{"id":"8673bf32.bb753","type":"ha-entity","z":"1c893a2.860cac6","name":"Run TTS","server":"632e5794.b26868","version":1,"debugenabled":false,"outputs":2,"entityType":"switch","config":[{"property":"name","value":"run_tts"},{"property":"device_class","value":""},{"property":"icon","value":""},{"property":"unit_of_measurement","value":""}],"state":"payload","stateType":"msg","attributes":[],"resend":true,"outputLocation":"","outputLocationType":"none","inputOverride":"allow","outputOnStateChange":false,"outputPayload":"$entity().state ? "on": "off"","outputPayloadType":"jsonata","x":280,"y":500,"wires":[["3adfb74.8ed4648"],[]]},{"id":"632e5794.b26868","type":"server","z":"","name":"Home Assistant","legacy":false,"addon":false,"rejectUnauthorizedCerts":false,"ha_boolean":"y|yes|true|on|home|open","connectionDelay":true,"cacheJson":true}]
附件json文件防止导入流失败
 flows.json.zip
(1.75 KB, 下载次数: 97)
接下来是说明需要修改的部分
第3个, Get TTS Text 就是获取你在第一步创建的文本元素当前的内容
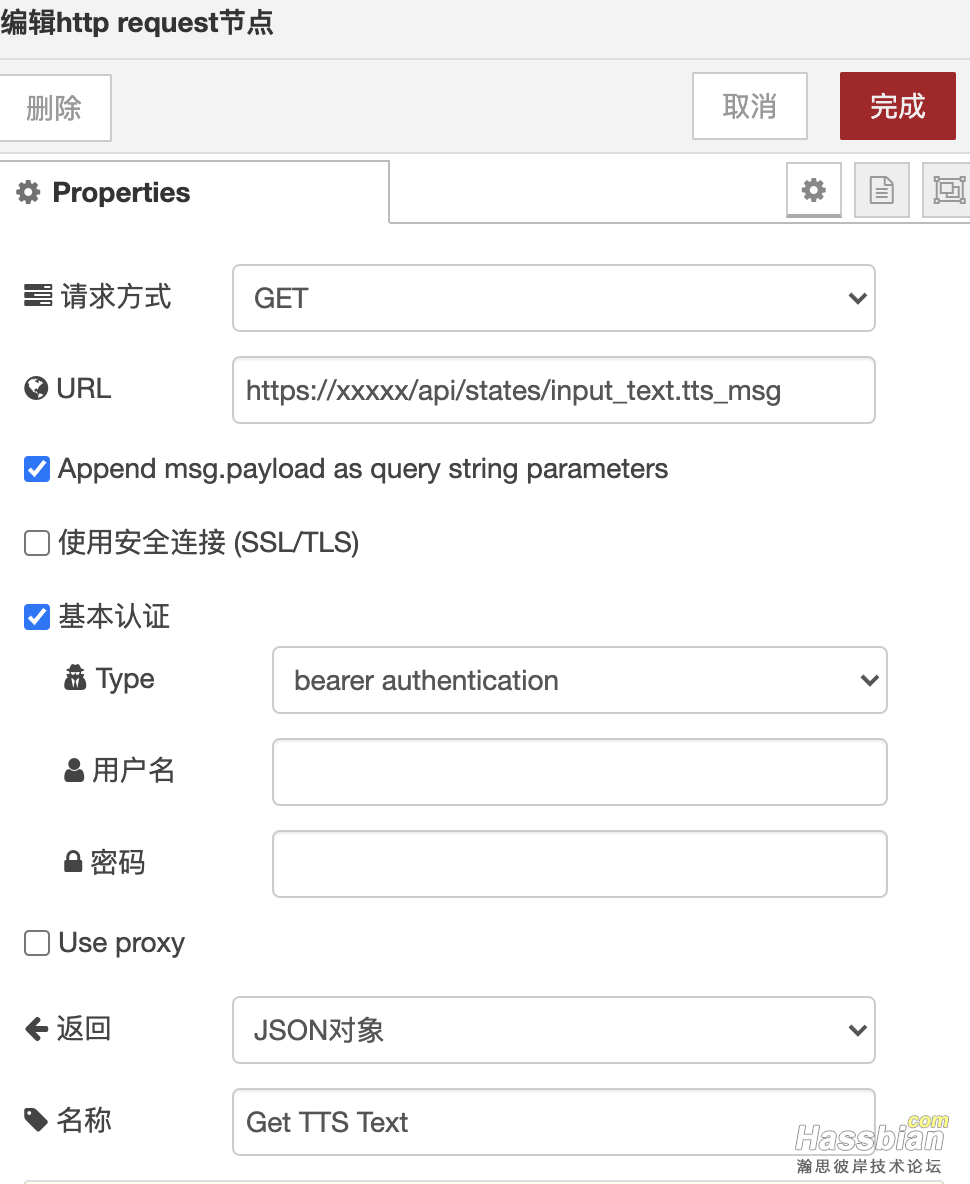
这里要求改URL中的xxxx部分到你的IP地址或域名. Http还是Https
以及用户名和密码. 密码是HA中生产的Bearer密码
第4个是准备生成TTS,我用的edge TTS,你也可以换成你的,Baidu或谷歌
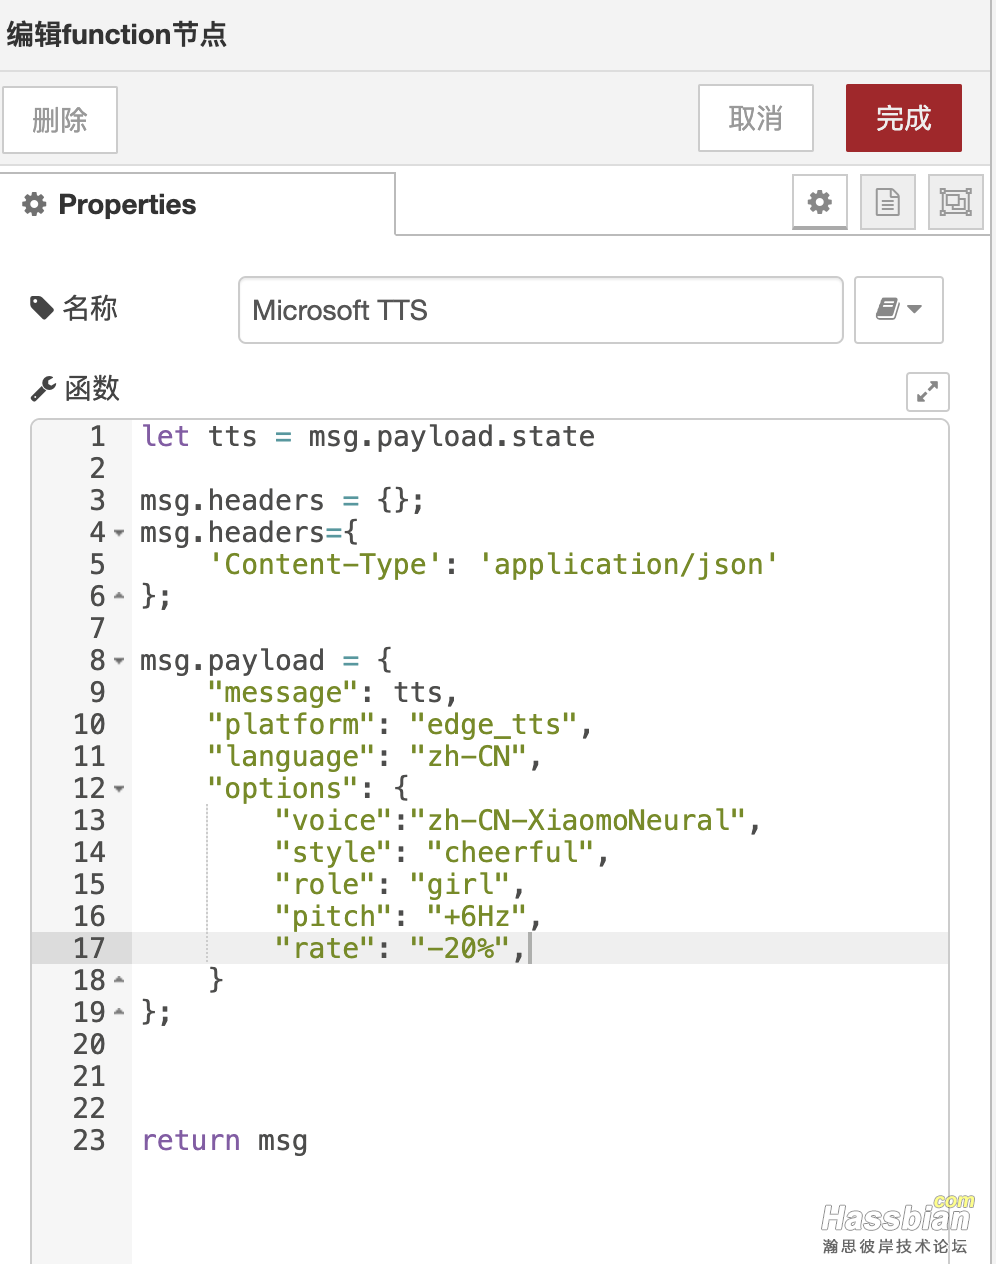
给大家一个谷歌的例子
let tts = msg.payload.state
msg.headers = {};
msg.headers={
    'Content-Type': 'application/json'
};
msg.payload = {
    "message": tts,
    "platform": "google_translate",
    "language": "zh-cn"
};

return msg
第5个是获取刚刚生成的TTS的URL
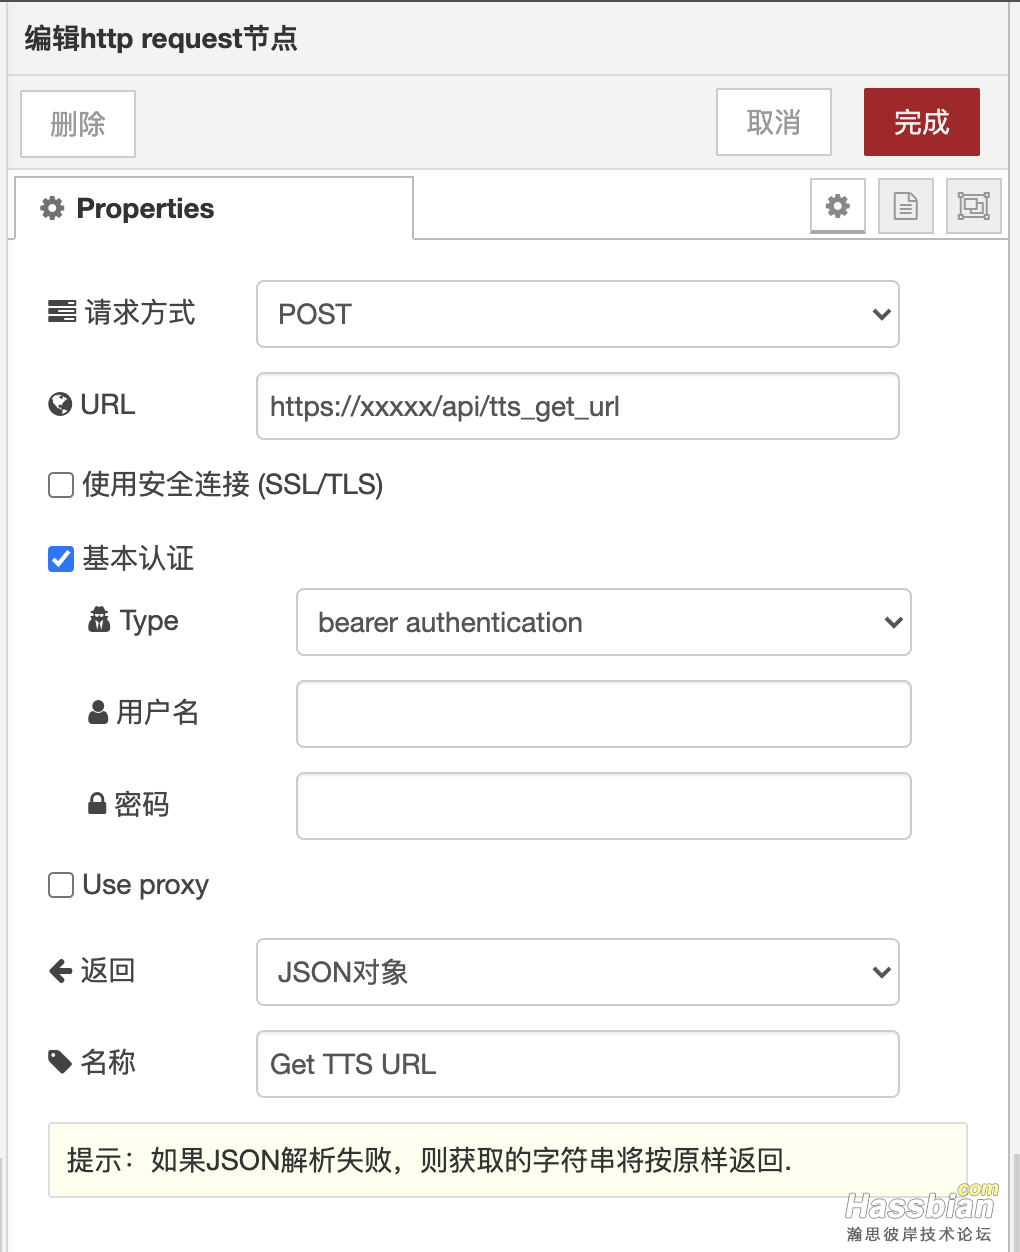
同样这里要修改URL,用户名和密码
第6个是,准备通过http post发送MQTT publish的内容
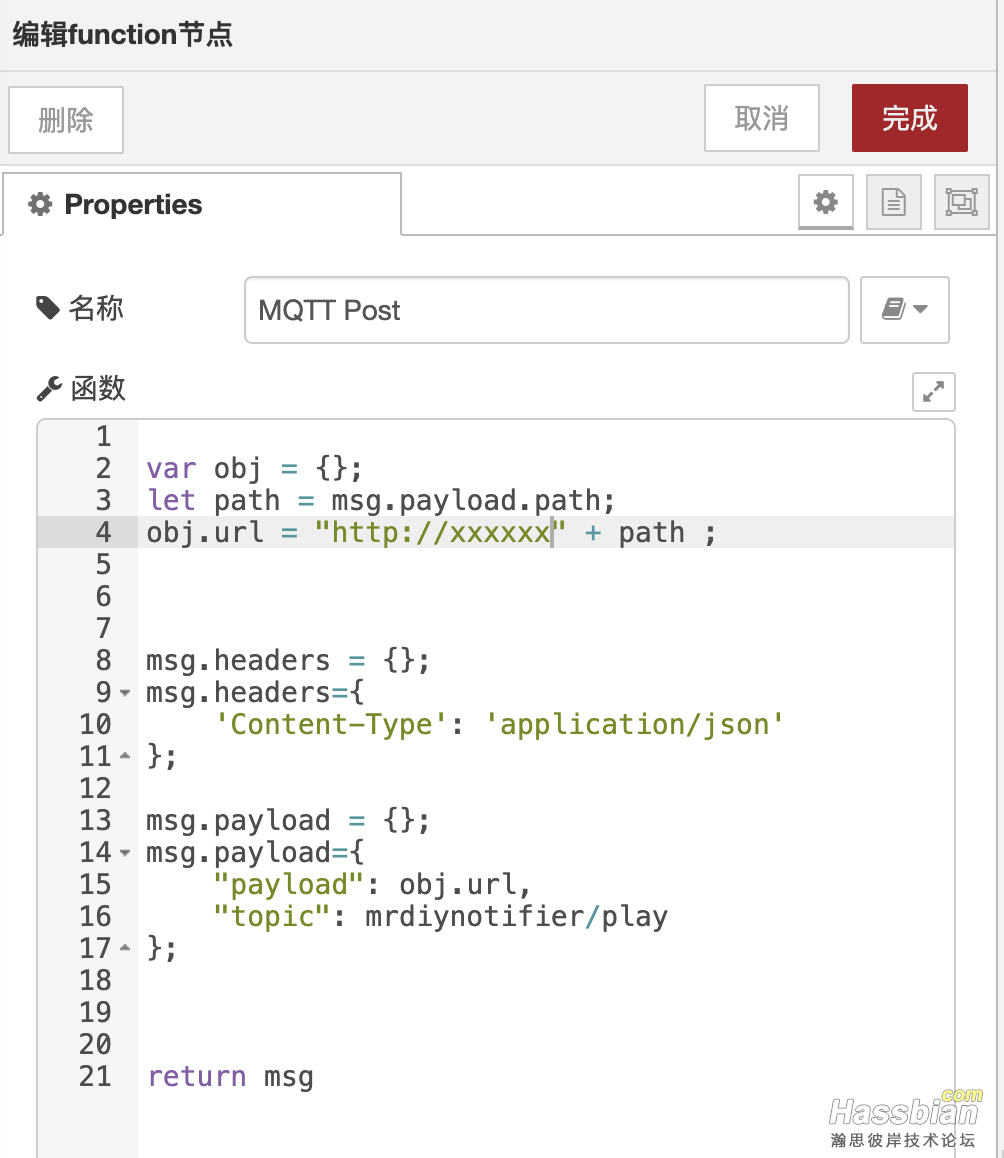
这里要修改的是url部分xxx的内容和http还是https
如果有修改默认topic的前缀mrdiynotifier的话,请修改为正确的
第7个就是发送MQTT publish了.
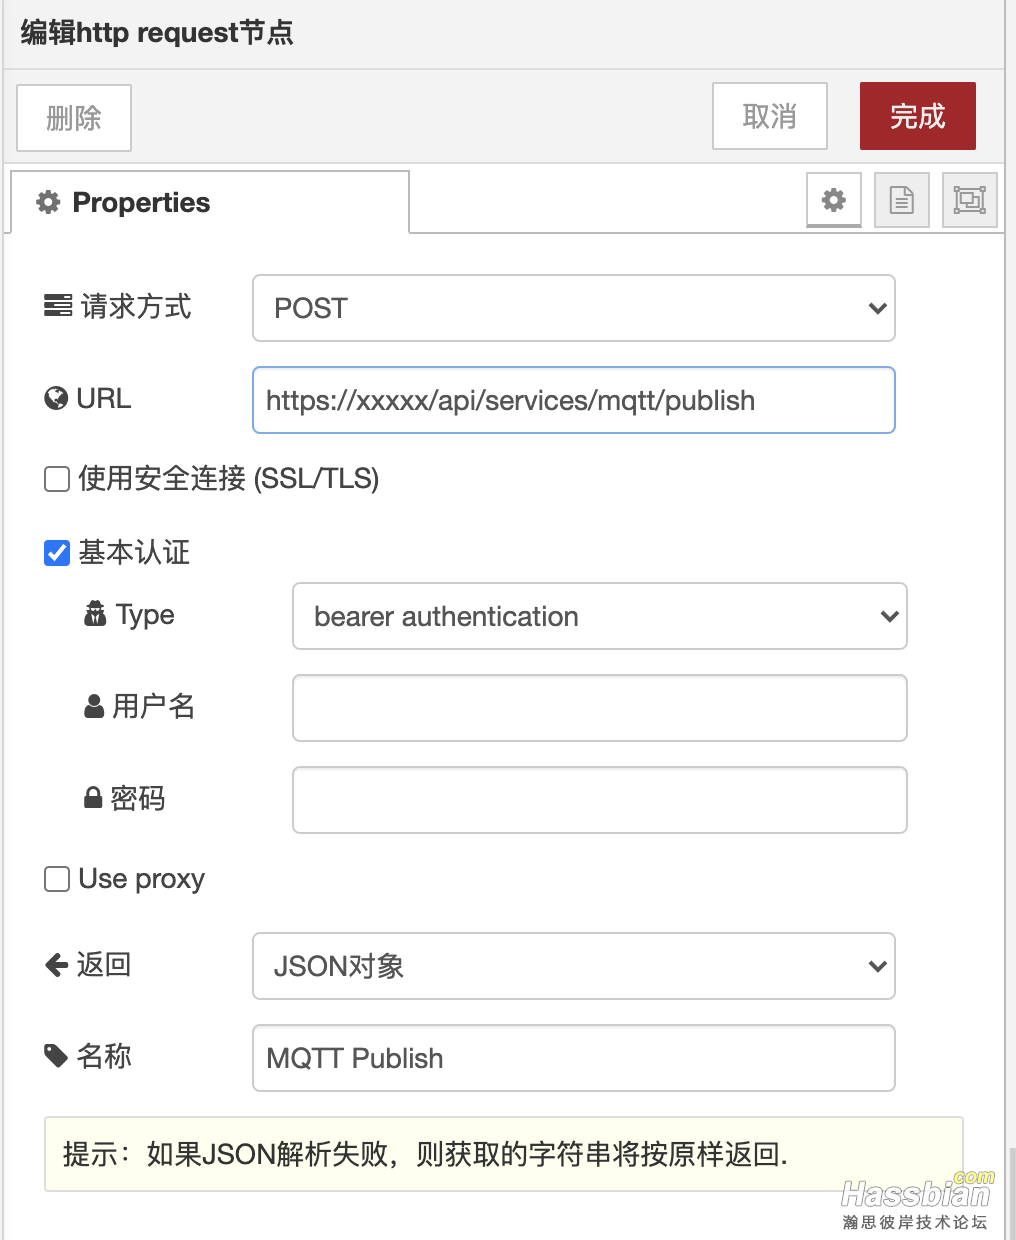
这里跟上面一样, 修改URL,用户名和密码
Nodered 修改完毕
这时, 你在HA里面把新建的文本元素显示出来,在里面输入几个字. 然后点击时间戳, 音箱应该就会播放TTS了
3. 这一步是如何在HA里自动化而不用在Nodered里手动点击.
因为之前在Node里创建了一个叫Run TTS的Switch, 这个会在HA中生成一个开关 entity_id是switch.run_tts.
请大家在工具中确保这个开关已生成,没有的话,可能要重启一个HA
之后就是创建一个脚本.调用nodered switch就可以了.
然后就把脚本在HA的front中显示出来.
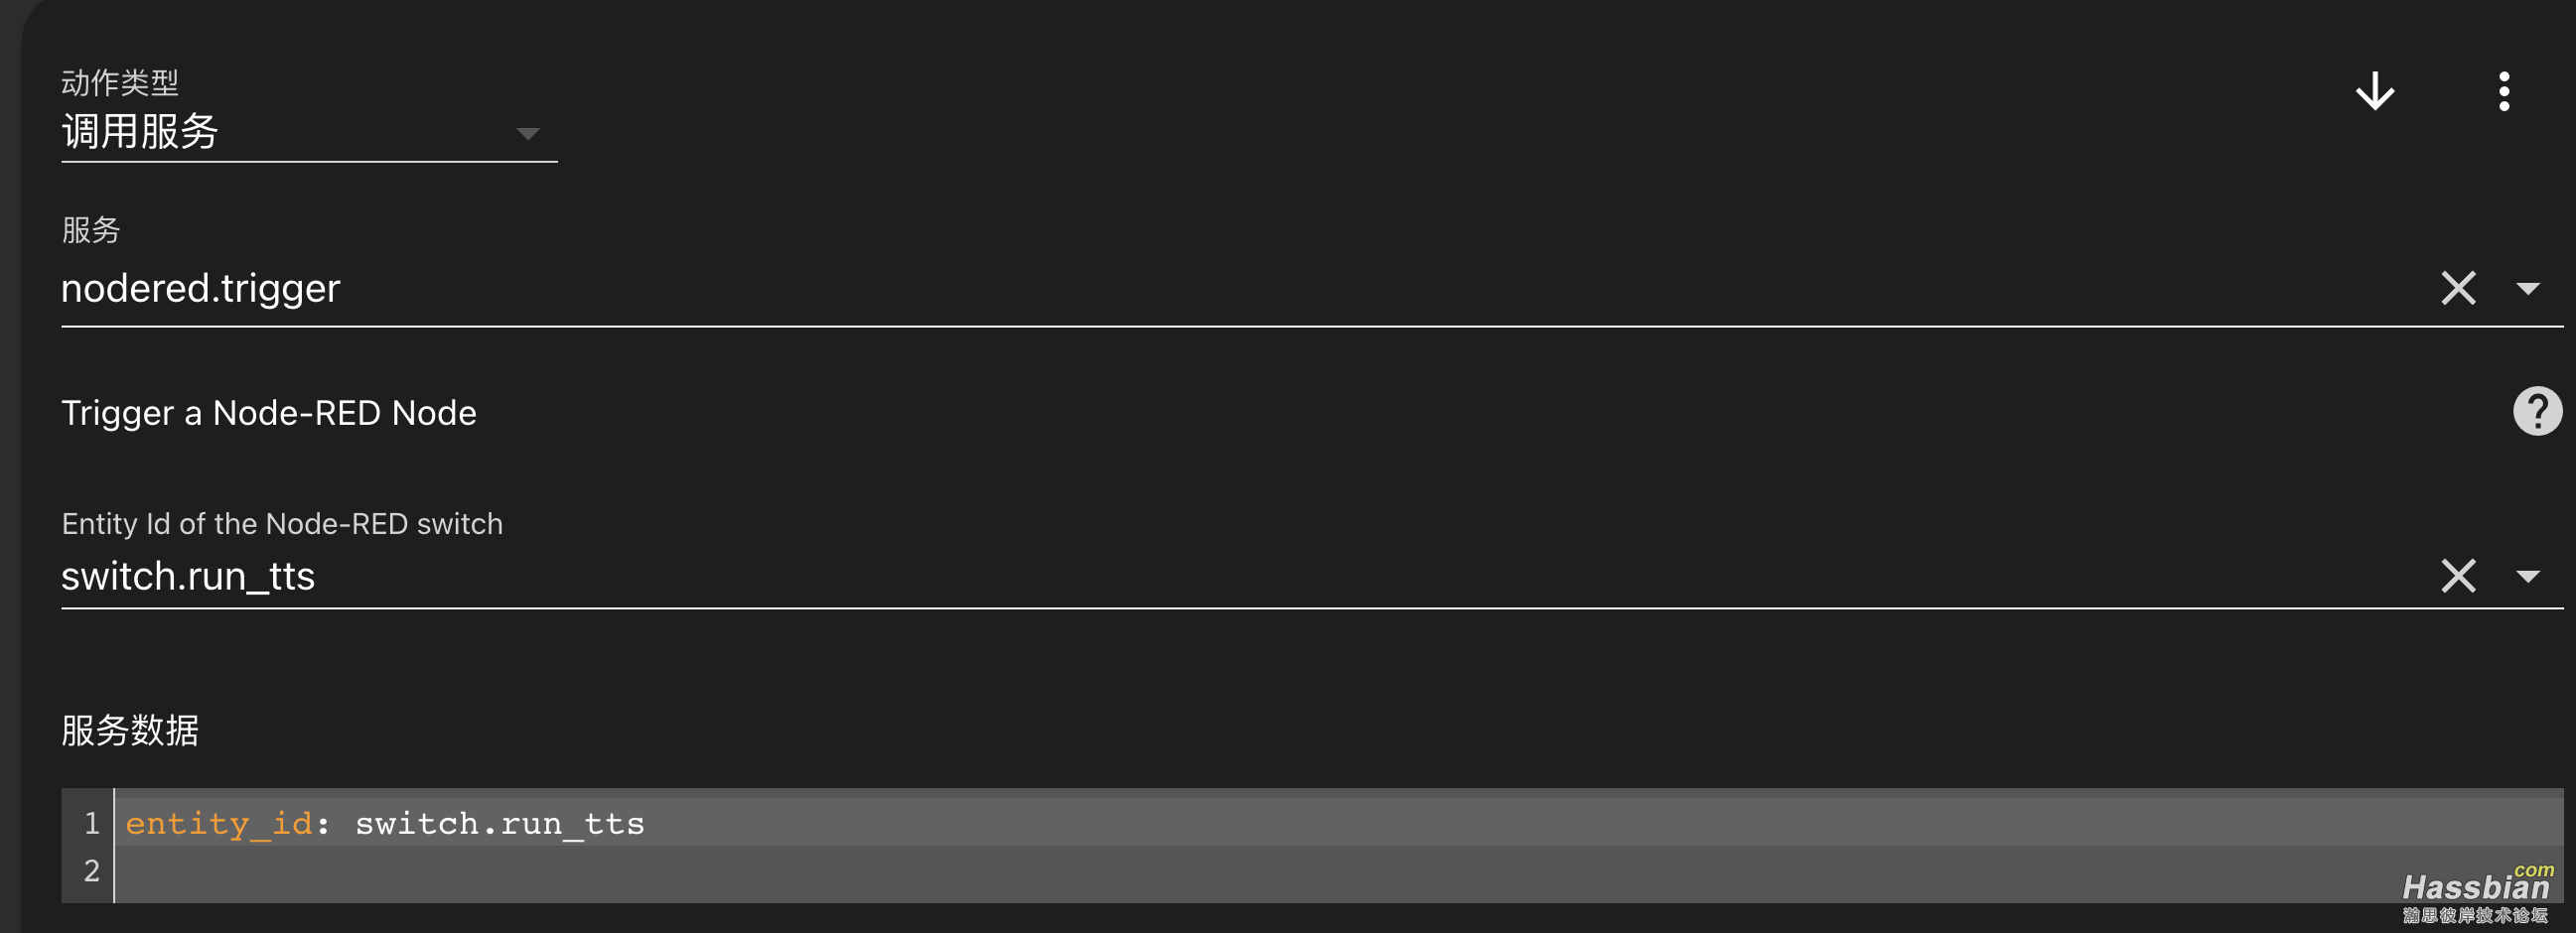
大功告成
一些额外信息, 我用了custom:button-card 所以以按钮形式启动脚本了.
如果有安装的,可以直接复制代码
type: custom:button-card
tap_action:
  action: call-service
  service: script.turn_on
  service_data:
    entity_id: script.run_tts
name: Run TTS
size: 45%
styles:
  card:
    - height: 40px
  name:
    - font-size: 13.5px
|
|